|
PalMod: Importing sprites
This is a quick guide to importing arbitrary sprites files from the internet to be used by PalMod for sprite display. PalMod has many sprites built in already, but you can use Photoshop combined with PalMod's palettes to see your work even if we don't already have a desired sprite.
Tools You Need For This
- Adobe Photoshop
- Crazy good image editing studio, with a free 7 day trial available.
- PalMod
- PalMod itself: a tool used to modify palettes in game ROMs or files.
- GIMP
- Optional: Useful for cutting out animation frames from animated GIFs and manually fixing color tables if needed.
- PalMod Photoshop ACTs
- Optional: A set of ACTs for use with PhotoShop that provide maximum possible color delineation, avoiding problems with repeated colors within the palette. Only needed for this task if you need to flip the color table - see below.
×
![]()
How To
Task 1: Figure out what character or game element you're interested in. Download a copy of that character sprite.
Task 2: Use PalMod to get the game's color table for that sprite.
- Open the ROM in PalMod.
- Go to the palette that you want to create a preview for.
- Go to the Tools menu and select "Save ACT Palette". We are going to use this to align the sprite colors correctly for PalMod's use.
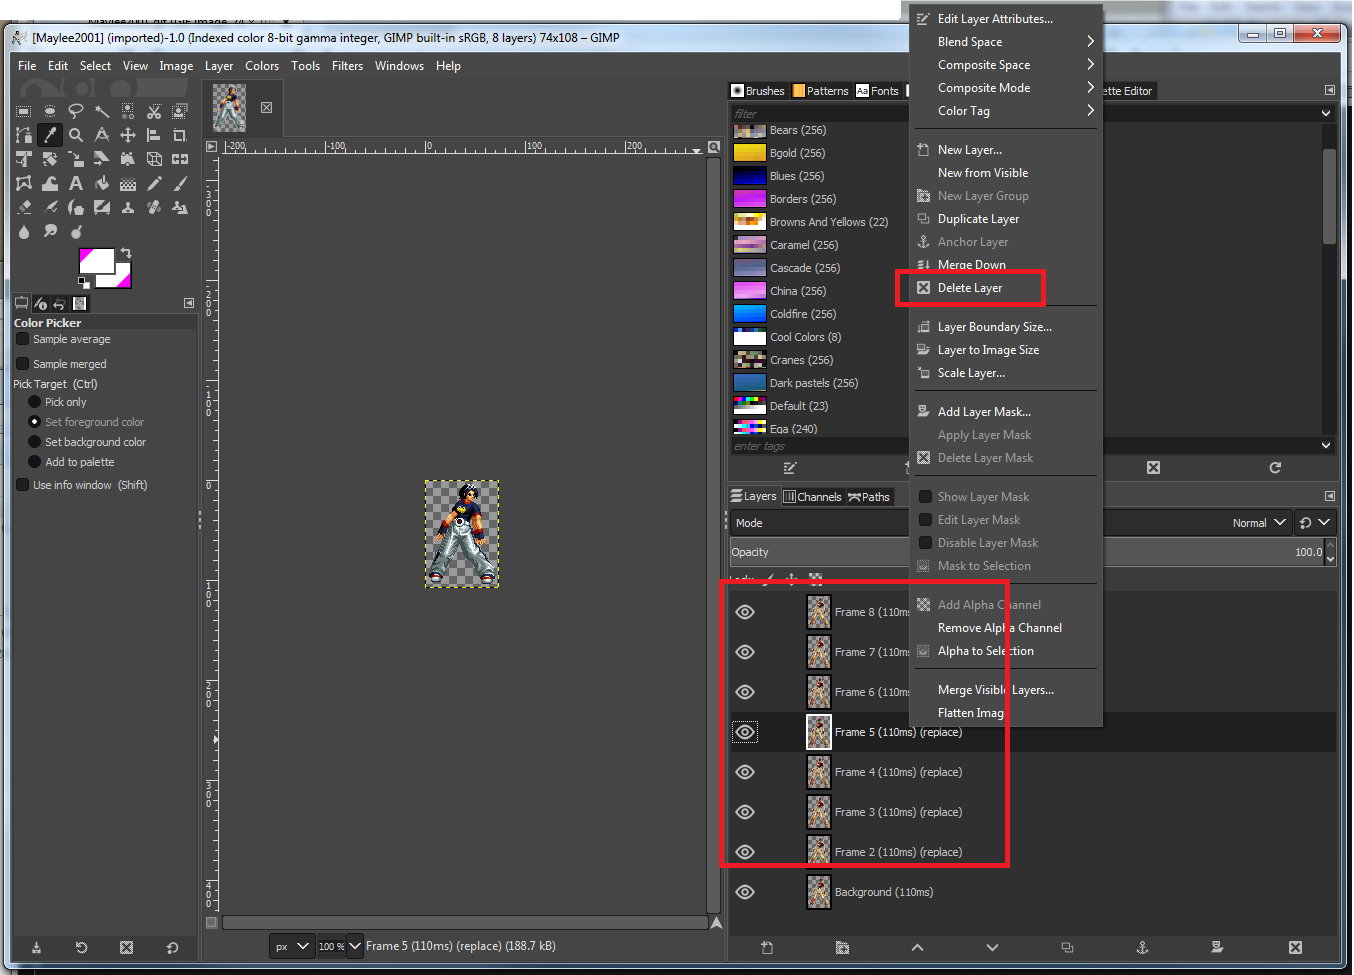
Task 3: If the sprite you downloaded was an animated GIF, strip out the animation using GIMP. Otherwise move on to Task 4.
- Step 1: Open up that animated GIF in GIMP.
- Step 2: For everything other than the Background frame (Frame 1), right-click on that frame and select "Delete Layer".
- Step 3: Go to File : Export As and export to PNG. Now you have the PNG that we need to work with.
Task 4: Set or validate the color table in Adobe Photoshop.
- Step 1: Open up that PNG in Adobe Photoshop.
- Step 2: Go to Image: "Mode".
- Step 2.1: If the Image Mode is RGB Color, skip to Step 3.
- Step 2.2: If the image is Indexed Color already: go to the Image: Mode : "Color Table..." menu. If that table matches what you see in PalMod for that sprite, skip to Task 5: Exporting.
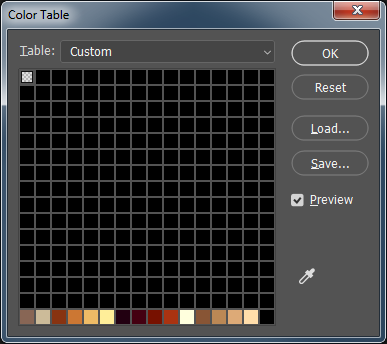
- Step 2.3: If the image is Indexed Color already, but the Color Table is upside down (all the used colors are at the end) as seen in this picture, skip to SubTask 4.1 to fix that.
- Step 2.4: If the Image Mode is Indexed Color and the color orders do not match PalMod's game palette, you need to reorder the palette. This can be a lossy process, so be careful. Go to SubTask 4.2.
- Step 2.5: If everything looks great, change the Image : "Mode" from "Indexed Color" to "RGB Color".
- Step 3: Now that the image is in RGB Color mode, go to Image : "Mode" and change the image to use "Indexed Color...". When the "Indexed Color" dialog pops up, select the "Palette:" listbox and change to "Custom...". On that dialog use "Load..." to load the ACT file you saved out from PalMod previously. Click OK. Click OK.
SubTask 4.1: Fixing an upside down color table.
- Fighter Factory exports out indexed PNGs (yes!) but inverts the color table (wtf?). So if you have a Fighter Factory PNG, let's fix that. Otherwise, skip to the next step.
- Step 1: In Photoshop, go to Image : Mode : "Color Table...". Click Load... and use Unique256Colors_Flipped.act from the PhotoshopACTs.rar file linked above.
- Step 2: Convert the file to RGB using Image : Mode : RGB Color.
- Step 3: Convert the file back to indexed PNG - except correctly aligned - use Image : Mode : "Color Table..." to Load the Unique256Colors.act.
- The image should now be using a correctly aligned color table. If the colors are correct, awesome! Move on to Task 5. If the colors got muddled during the import - for example if there are duplicated colors in the color table - we'll need to manually reconstruct the table. Follow SubTask 4.2 sadly.
SubTask 4.2: Reconstructing an incorrect color table.
- Sometimes you have an indexed color PNG that has a mis-sorted color table. You can actually fix this up if you need to. Otherwise skip to the next step.
- Make sure you have the palette of interest open up in PalMod. We're going to be matching that exact palette using GIMP now.
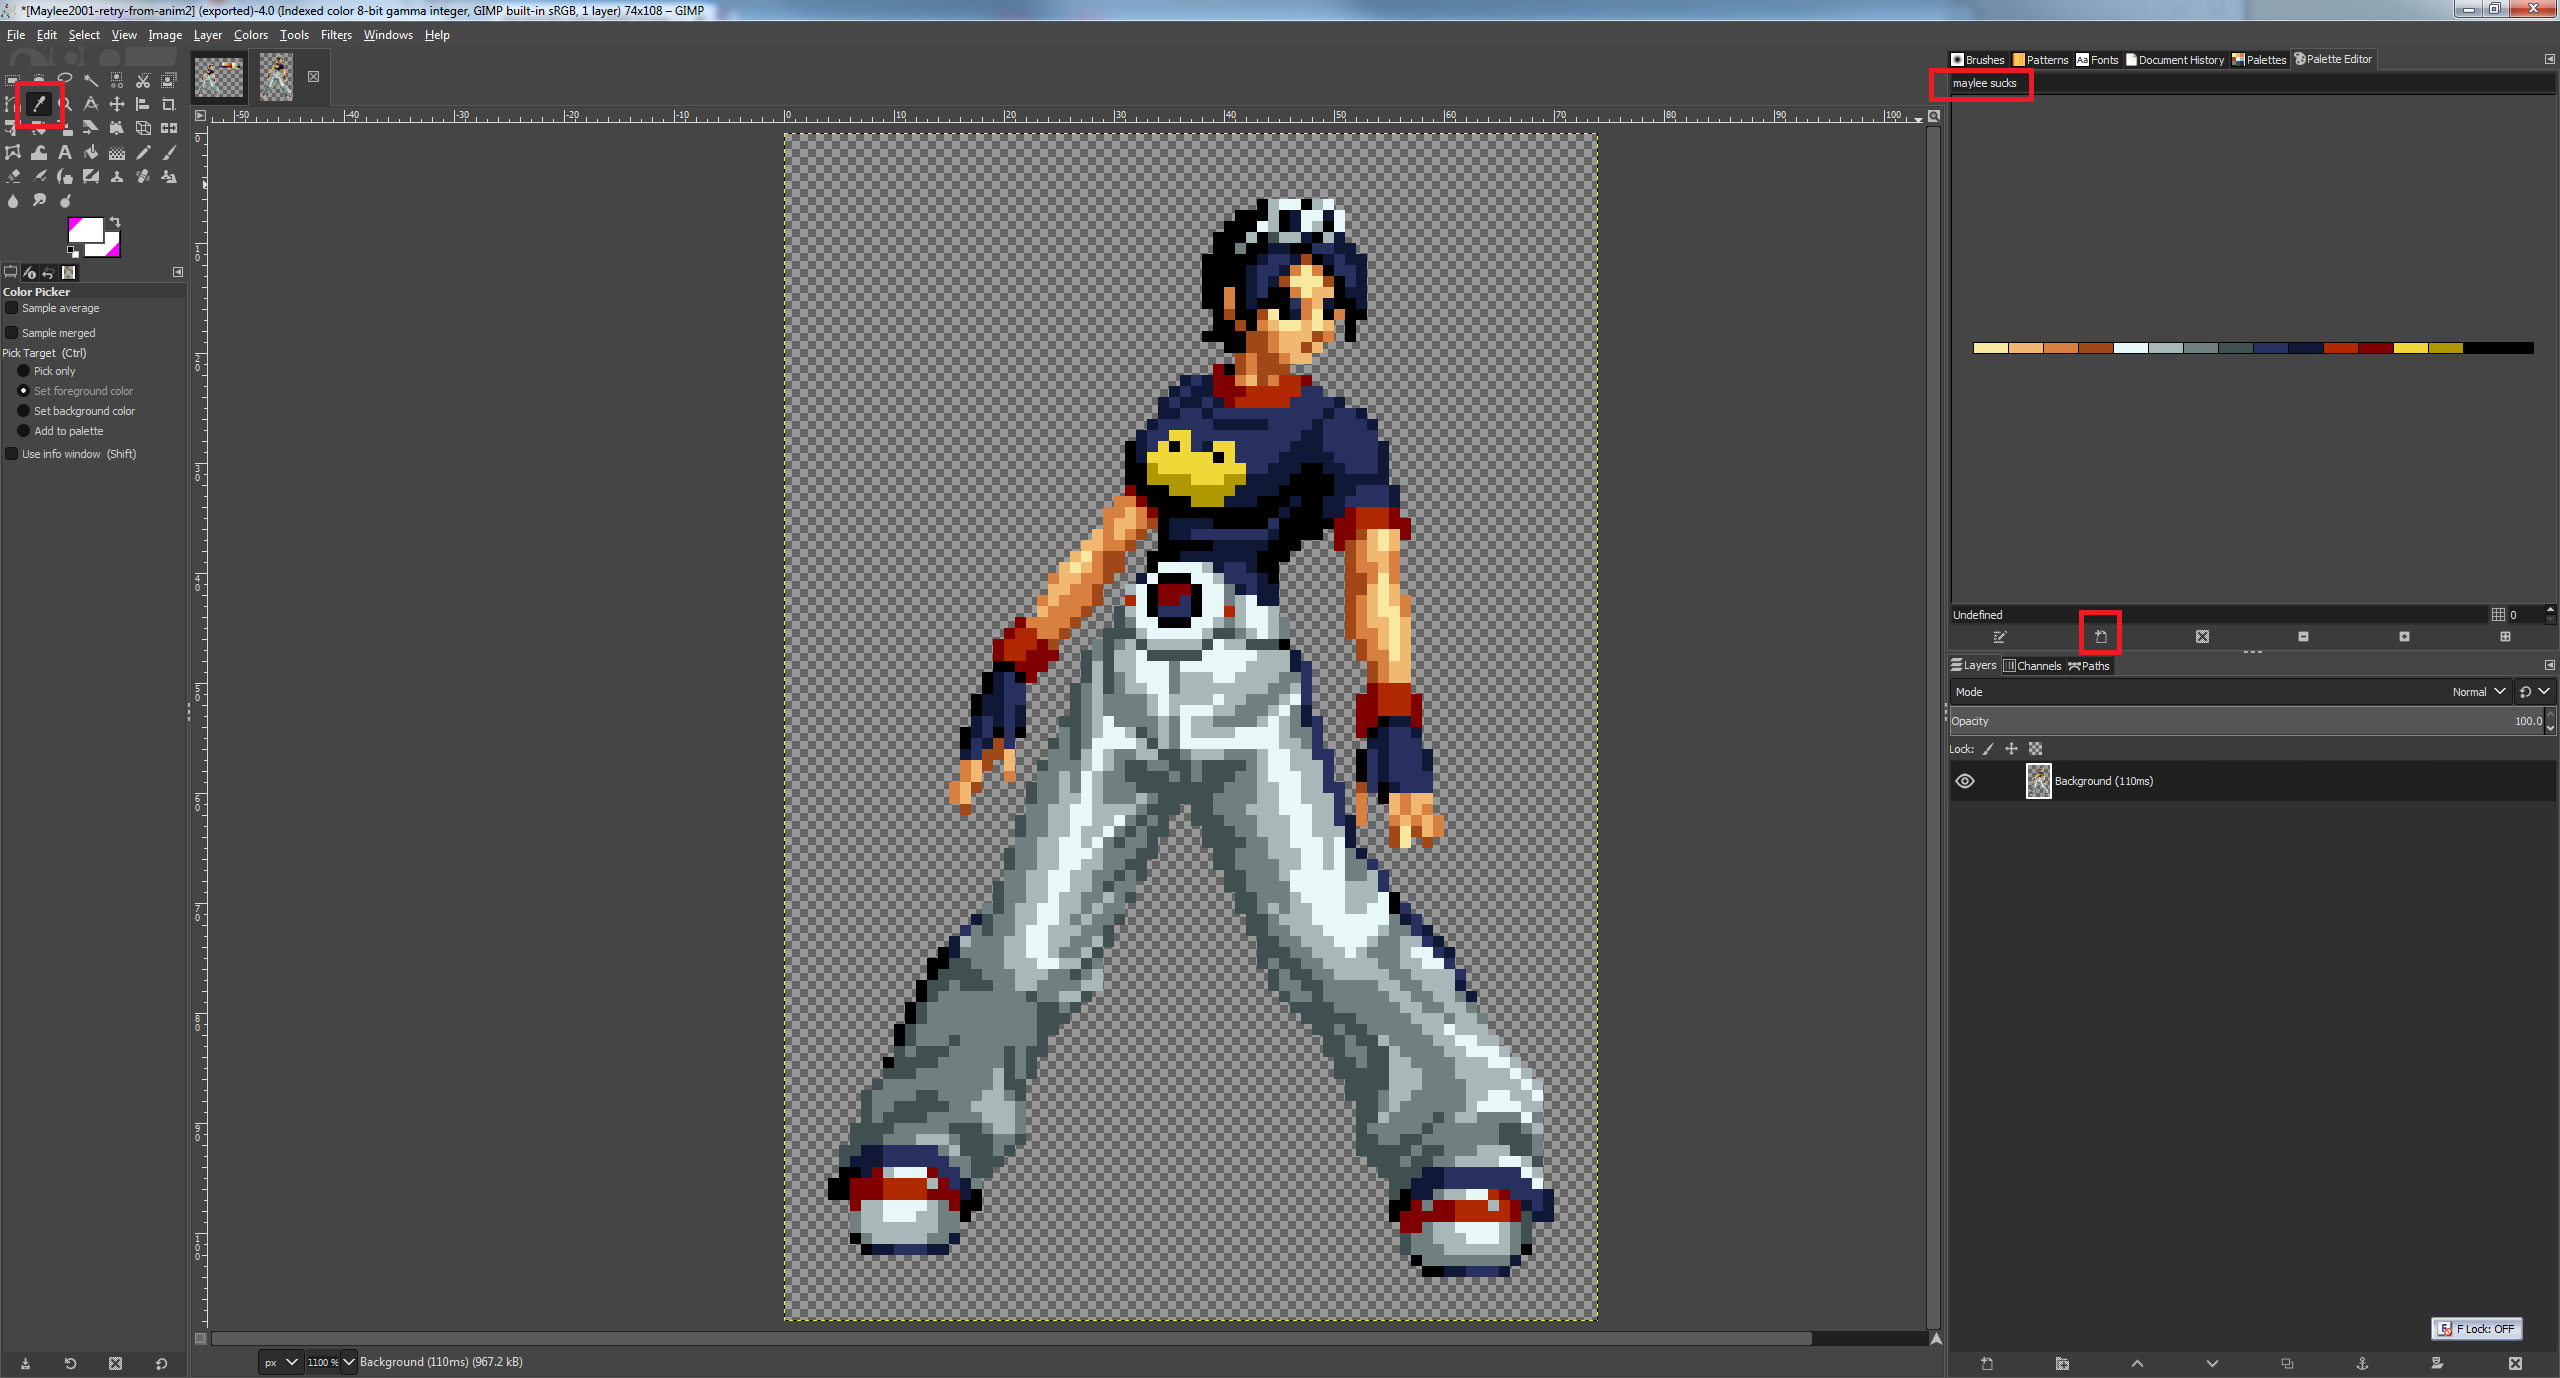
- Step 1: In GIMP, click the "Create Palette" button in the Palettes tab.
- Step 2: Go to the Palette Editor tab.
- Step 3: IGNORE THE FIRST COLOR YOU SEE IN PALMOD. That's the transparency color.
- Step 4: For the second color you see for the palette of interest in PalMod onwards, find that exact color in the PNG. Use the Color Picker Tool to load that color. Then click the "Create a new entry from the foreground color" button in the Palette Editor to add that to the palette.
Once you're done building your own color table, it should look exactly like what you see in PalMod - except missing the first color shown in PalMod.
- Step 5: If the PNG is still using Image : Mode : "Indexed..." color, switch it to Image : Mode : RGB.
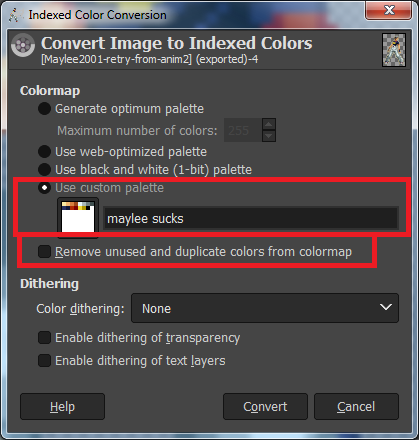
- Step 6: Now that we have an RGB PNG, switch it back to Indexed using "Image : Mode : "Indexed...". Click "Use custom palette" and give the name of the palette you created. Make sure you uncheck "Remove unused and duplicate colors from colormap".
- Go to Task 5 now.
Task 5: Export the indexed PNG to a RAW using Adobe Photoshop
- Step 1: Go to the File menu and choose "Save As...".
- Step 2: Change "Save as type:" to "Photoshop Raw (*.RAW)".
- Step 3: RAW files are pure image data: they do not include any header information. As such, we need to use a special filename syntax to tell PalMod how to handle the file. We will want to include the Canvas "W" and "H" values in the filename itself.
- Step 4: PalMod wants filenames of the form "(whatever)-W-WIDTH-H-HEIGHT.raw". An example of a possible filename would be "kobun-bullmover-W-200-H-120.raw". If you do not include the width and height data in the filename, PalMod cannot load the file. If you specify the wrong width or height, PalMod will not load the file correctly.
- Step 5: Click OK, click OK on the Raw Options and now you have a RAW file for use with PalMod.
Task 6: You're done! Use that new RAW in PalMod.
- Go to File and choose the option (Load ROM or Load Directory) that lets you load the game you want to edit.
- Use the comboboxes on the right to find the character (or game element) of interest and then the particular palette of interest. For example, the "Kobun" character, the "LP" color, and the "(05) Bull Mover" palette.
- To load the RAW file we created in Photoshop, just go to PalMod's Preview window. In the File menu select "Load Texture". Then load the RAW file you used earlier.
- If this all worked correctly, you should see the current palette used to colorize your RAW sprite. If the image shows up screwy, you probably used the wrong W and H values in your RAW file's filename.
Note if you're trying to modify a paired palette (such as Captain America's palette which is displayed in conjunction with his shield palette), you may want to replace both RAWs that PalMod is using. If you just want to replace one of those and not see the other, create an empty/dummy RAW and set that for the sprite that you don't want to see.
If everything checks out here, consider submitting the RAW to the PalMod team for integration so that others can benefit from your work.
×
![]()
|