|
PalMod: Finding palettes with MAME and PalMod.
This guide is intended for people that want to find (and potentially modify) palettes in a game using any emulator that provides a palette viewer. In this walk through we are using MAME, but other emulators will work too as long as they have a palette viewer available and use "normal" color display. There are other arguably better ways to do this: this is just one way you can do it.
Tools You Need For This
- PalMod
- PalMod itself: a tool used to modify palettes in game ROMs or files. You want the current version as it has key features.
- MAME
- The legendary emulator. We need this for the Palette Viewer You also will probably enjoy installing the MAME Cheat Engine, so you can turn on things like infinite life, time, and etc. That can make finding palettes much less stressful. Your emulator MUST support turning off graphics filtering. If it tweaks colors to not be game-actual, this process will not work. So turn off graphics filtering before starting.
- The ROM for the game you're interested in.
- If you want your life to be simple, you're going to start with one of the game ROMs that PalMod already supports. If you're feeling frisky, you can load other ROMs into PalMod. You're going to need to know what color format the game uses, though. The notes in the MAME headers for games they support can often tell you what color format you're looking for: or if it is on a platform that PalMod has support for we may already have the likely color format noted in the Read Me (and the Settings : Color Format text). You generally want to use the NoCD versions of games if they are CD based: that saves a lot of load time.
- An Extras file.
- This is a text-file extension to PalMod. This is a powerful extension that lets you use PalMod to read regions of the ROM that PalMod doesn't already know about. We'll set this up in a later step. Note that for some games PalMod may not support an Extras file: you cannot follow these steps if the version you're using does not use an Extras file. If PalMod supports that game directly but does not have Extras file support for that game, you can still proceed by using PalMod's Developer Mode load game options. Documentation for the Extras file syntax can be found in the PalMod "Read Me" file.
Concepts
- Game textures
- In order to efficiently allow a game to recolor a sprite, the sprite is usually stored as a texture. A texture is raw image data that is functionally a paint-by-number sheet. When people create a RAW file, that is the equivalent of a game texture.
- Palettes / Color Tables
- Palettes, or color tables, are the colors used to fill in that paint-by-number texture. One important factor is that there will always need to be a color for the background of the sprite: that is usually the "color" at position 0 in the palette. Some games actually stuff extra data in that position so it's sometimes important to never change that. The position 0 color is called the transparency color (since you want to set the sprite inactive area to be clear) or the counter color (for some games that stuff counter data or other information in this 'color'). Note that some older games use the trailing color as the transparency color, but for the purposes of compatibility PalMod always uses position 0 (which results in the same net effect). (Transparency color being index 0 is also in alignment with Adobe's Color Table file format (ACT) which functionally only allows that.)
- Hexadecimal
- You tell PalMod what locations to read using hexadecimal (hex for short). That is a base 16 system that is usually represented as "0xNUMBER". (Decimal is represented by "0nNUMBER", but PalMod forcibly treats all numbers as hex.) Hex numbers count as 0, 1, 2, 3, 4, 5, 6, 7, 8, 9, a, b, c, d, e, f, 10, 11, etc. PalMod will let you write a hex number as either "a9a9a9" (raw) or "0xa9a9a9" (has the indicative '0x' prefix). I prefer the "0xa9a9a9" style.
- Palette storage
- Games will typically store their palettes in one region of one game file. Palettes for most games only ever start on even numbered locations (ending in 0, 2, 4, 6, 8, a, c, or e). If you get lucky, the palettes will align / start on 0x...0 locations. If the palettes have their transparency color at a different location, please make sure you update your palette file to have that transparency color location set as the first position in that Extra. If you don't do this and try to have PalMod write to the game, we might stomp on the transparency color which can cause weird effects.
In some cases a "game file" might be split into individual SIMMs. You can use PalMod's "Interleaved File" mode to handle that kind of split.
- Palette length
- Classic fighting games typically use 16 colors per palette, then there is another palette (lead by another transparency color), and repeat until the end of palette storage. When games started to get fancy around the SF3 era, they started using more colors: palettes can be a hard maximum of 256 colors. After that there will be another transparency color and another palette. A sprite can use be comprised of multiple textures that use multiple previews. While Ryu might be one texture using one 16 color palette, Captain America is typically two textures (body and shield) using two 16 color palettes (body and shield). And stages of course go off the deep end, using many many textures and many many palettes - sometimes iterating those for lighting effects and other animation effects.
Goals: What We Have To Accomplish Here
In order to find a palette so we can modify it, we are going to need to achieve these specific steps:
- Find the sprite in the game
- Find the palette in the game
- Find the palette in the ROM
So let's get started! For the purposes of giving you something concrete to look at, I'm going to find and rip the Stark Enterprise vehicle part of the Iron Man stage in Marvel Super Heroes (MSH), using mshj.zip for MAME.
Step 1: Find the sprite in the game
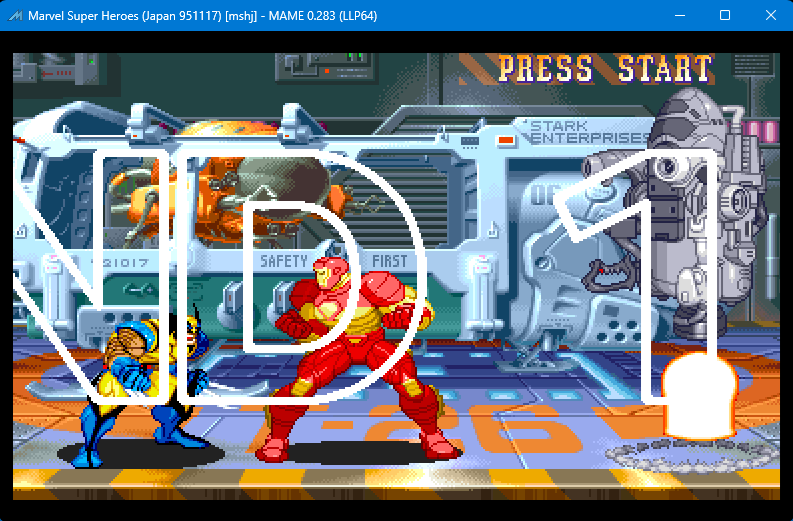
This is probably the easiest step. Play the game in the emulator! When you see the palette in the game that you want to modify, pause your emulator! In MAME that is F5. Here we have MSH paused in MAME on the Iron Man stage:
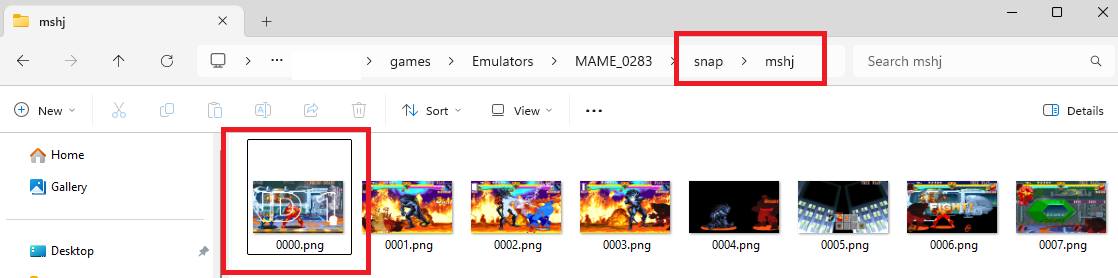
Take a screenshot of that palette in action. In MAME that is F12, and it puts them in the "Snaps" subfolder for your game. On my system that is "MAME\snap\mshj" for this MSHJ game that we're looking at.
Now open up that image in an image editor that allows cropping. It will start looking like this:
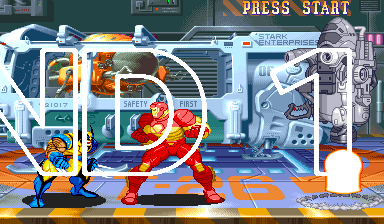
We don't have to, but to save time you can edit that image down to just show the sprite you care about. You can be very imperfect here, but the more isolated the sprite is the easier this process will be. I've taken raw unedited screenshots and used this though: it's just slower.
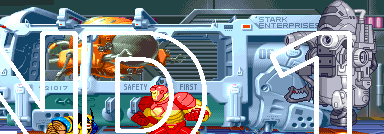
Again, notice how sloppy that editing is (I deliberately made it bad for this example). I just removed some areas clearly not of interest to me.
That's it for now: we'll come back to this image.
Step 2: Find the palette in the game
Here is where things start getting a little complicated. Thankfully this is all logical.
First we need to open up the Palette Viewer tool in the emulator. In MAME you can do this by pressing F4. It starts by looking like this:
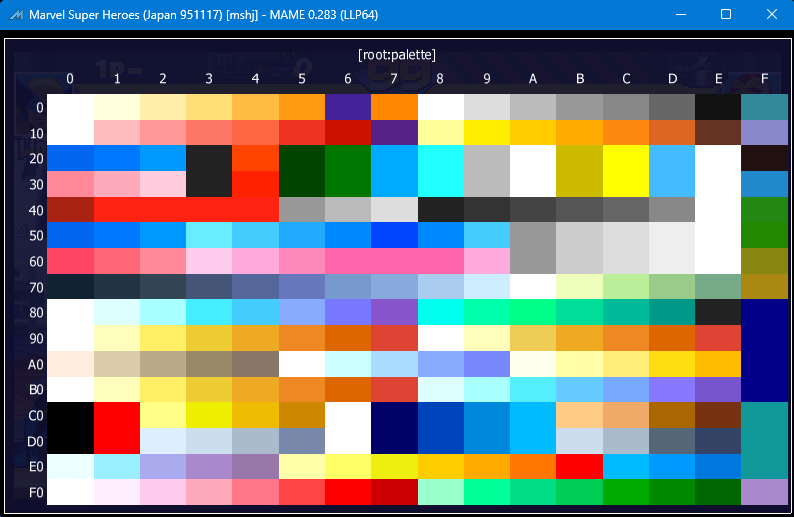
Now we want to Zoom out so we can see as much as possible at one time. In MAME this is done via pressing the minus sign "-". On different systems you might need to scroll down to view all the palettes, but thankfully the CPS2 color storage area is smaller than some platforms so it all fits in one screen. Here's what our zoomed out palette looks like:
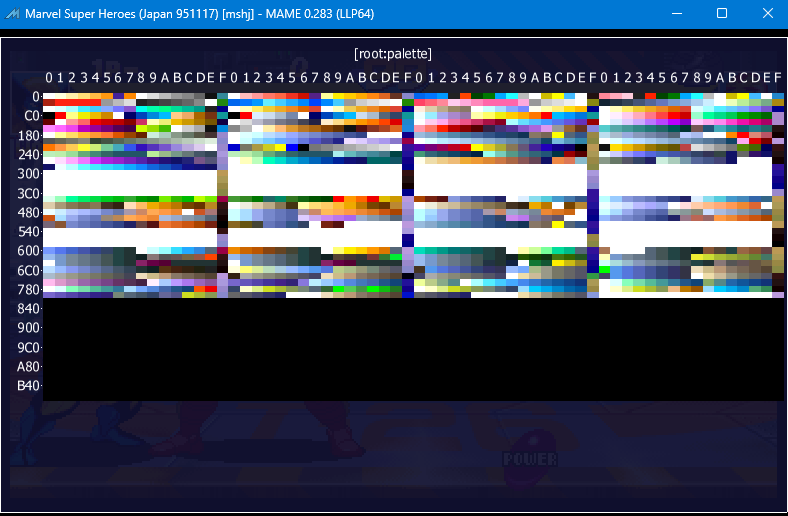
Take a screenshot of the palettes you can see onscreen. I use ALT+PRINTSCREEN to do this, and then paste that from the clipboard into MSPaint or any other graphics tool. Save that!
If there are more palettes than this one screen worth, scroll down in the Palette Viewer. In MAME you can do this by pressing the down arrow. Once you have a new set of palettes onscreen, take another screenshot and save it. I like to number them when I save them so I remember where I am. Keep scrolling and taking screenshots until you reach the end. You want each palette covered in at least one of your files: you don't need multiple pics, just need to make sure that every palette is in your screenshots at least once.
Now we play the matching game using PalMod!
First, let's make sure your emulator isn't filtering graphics.
- Load your game in PalMod.
- Have it be showing you any palette: we do not care what it is, and will not be saving palettes yet. Click the first color in that palette so PalMod knows where to begin pasting data.
- Bring up the first screenshot of palettes you took. Blow it up/zoom in so you can more clearly see the individual colors in that palette.
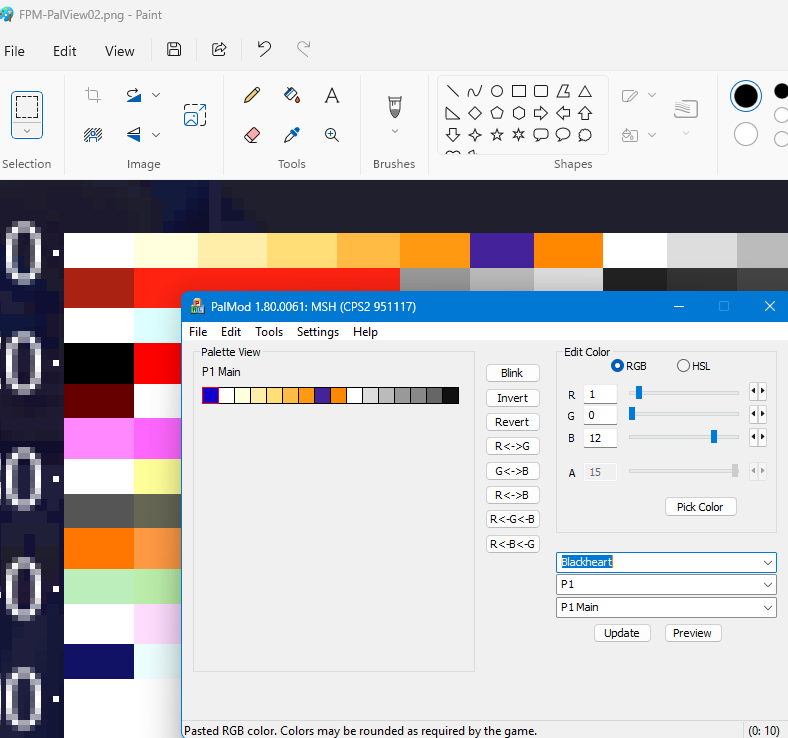
- While PalMod is the active application, move your mouse cursor over the the colors in the palette and press CTRL+SHIFT+N over say the first ten colors in the palette. (If you use CTRL+SHIFT+A, PalMod will copy the first 15 colors rightward from the point your cursor is it, if it can figure that out. But that's slightly advanced.) So now you have in PalMod a view of that same palette (any palette) you looked at in the Palette Viewer, like so:
- Go to PalMod's Previews : Settings : Drop Settings and make sure "PNG/GIF drops here are palettes" is unchecked (turned off). (Note that if you are using WinKawaks that has bad math, so turn on the "Use WinKawaks correction" option if you're using WinKawaks. Otherwise you don't want it on.)
- Drag the first palette screenshot of the Palette Viewer you took onto the PalMod preview window.
- You should now see the colors you pasted into PalMod in the PalMod preview window! The palette screenshot should be filtered down to only show you matching colors of the currently loaded PalMod palette that we had changed, and everything else will drop out. There will be some extra unimportant noise, but the key is that you should be able to see the exact palette show in PalMod's preview window as seen here:
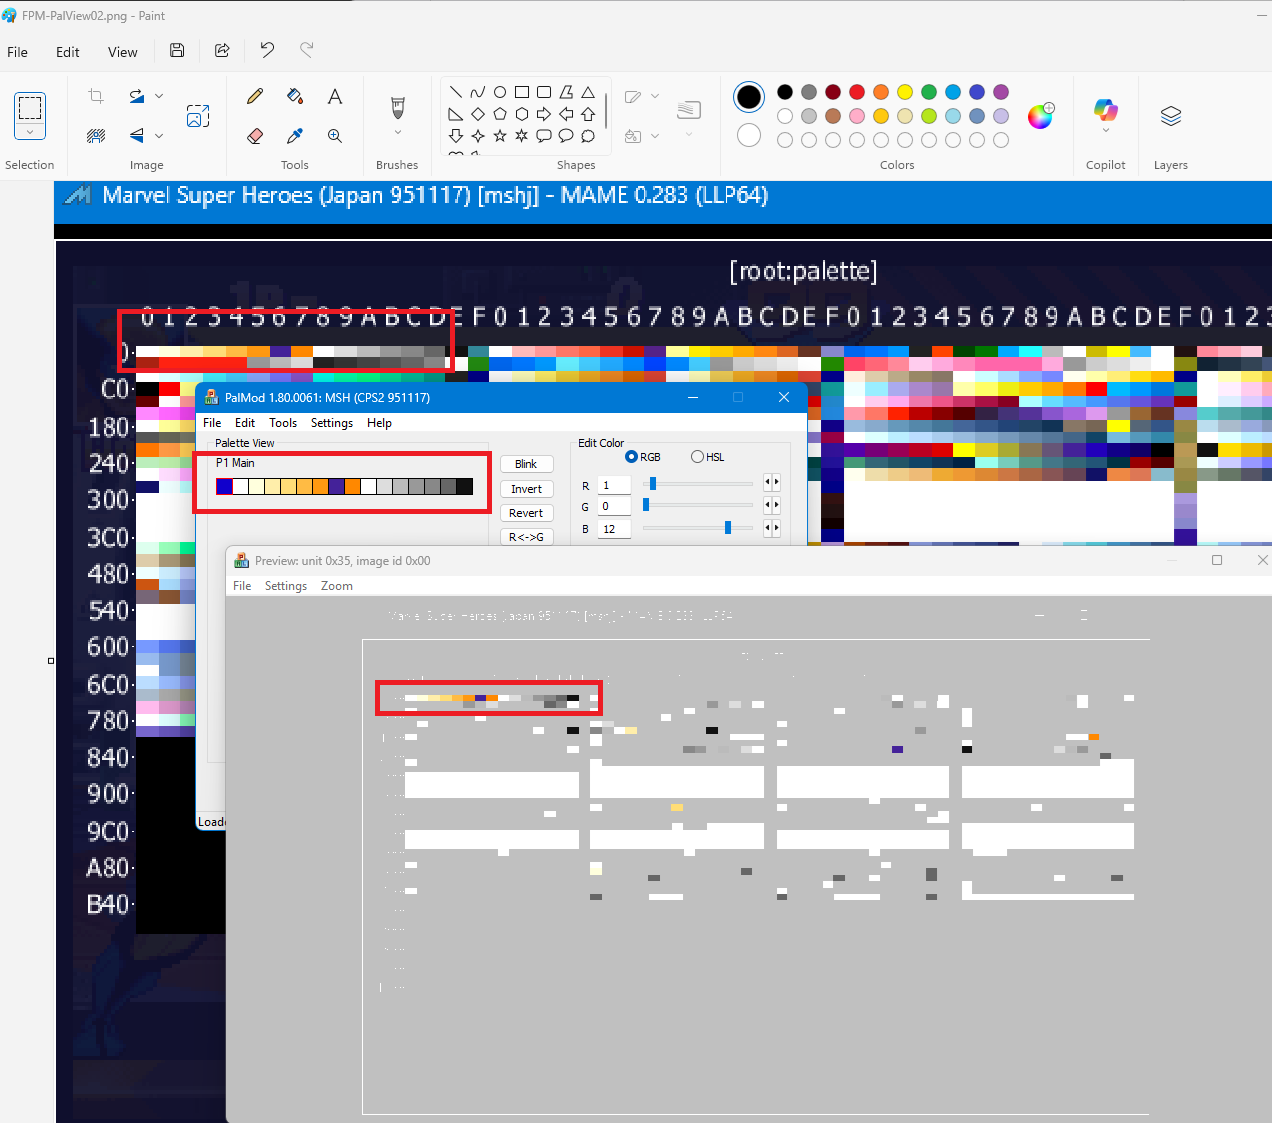
- It is important that you see the colors you pasted: if what you paste into PalMod is not in the game image, that indicates that the game is doing post-processing graphics filtering and you must turn that off and restart these steps once you are getting true colors. MAME produces colors we can work with, and WinKawaks produces colors we can work if you turn on the "WinKawaks math" option in PalMod. Other emulators might not work.
OK, so you now have verified that you are getting accurate colors. Success! Next we need to match that sprite screenshot to the palette screenshot.
- Bring up the sprite screenshot. Blow it up/zoom in so you can clearly see the individual colors in the image.
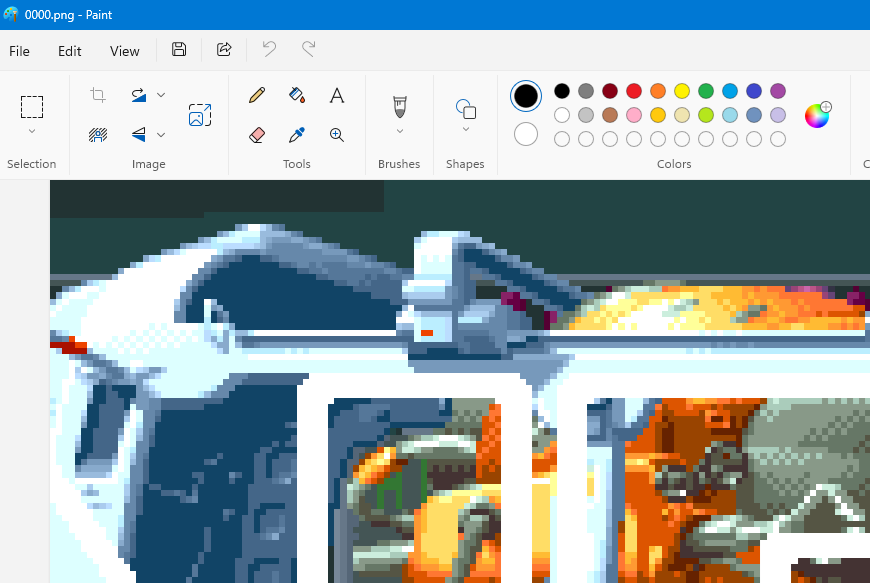
- Copy a bunch of colors into PalMod's palette using CTRL+SHIFT+N cursor magic. The more the easier, but as long as you get at least ~5 colors you should be good to go. These colors here are from the orange vehicle:
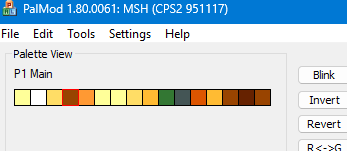
Sweet. We now have unsorted palette colors. In order to make progress, we need to figure out how to sort them and where they are stored.
- Bring up the first palette screenshot. Drag and drop that onto PalMod's Preview window. If this is where the palette is, or at least an interesting candidate, you should see every color you copied in a nearly contiguous block in the Preview window's filtered display of that palette. Here's what we see:
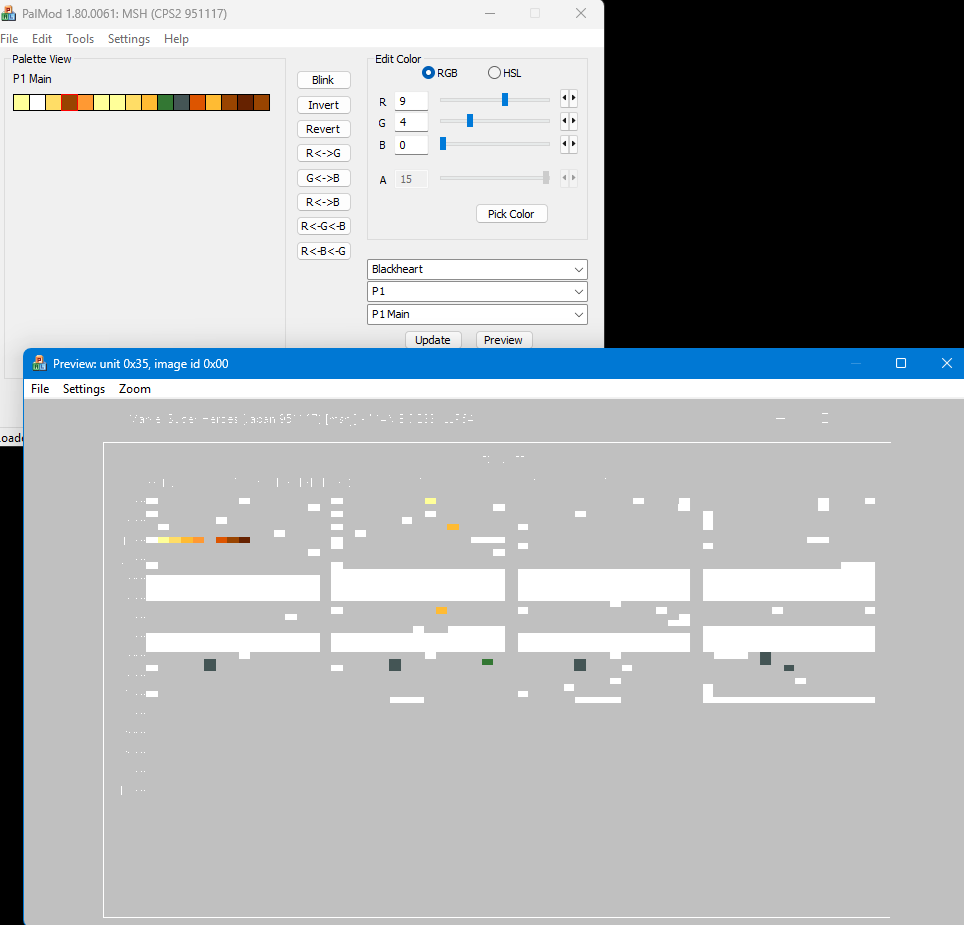
If you don't see any, or if the colors are just scattered around one by one, that's probably not what you're looking for. Make a note of where any palette of high interest is: we'll want to refer to them in the next part. If you had to take multiple palette screenshots, make sure to check all of them, and try to figure out which palette most closely matches. There might be multiple great matches: in that case investigate each.
But! In our case we have a very clear match.
OK, we now have a list of possible palette matches. We now need to convert those locations into color data for the game.
- Select color 1 in the current palette in PalMod.
- Mouse over the beginning of any palette of high interest from your palette screenshots, while keeping PalMod in the foreground. In this case we can clearly identify the most likely palette:
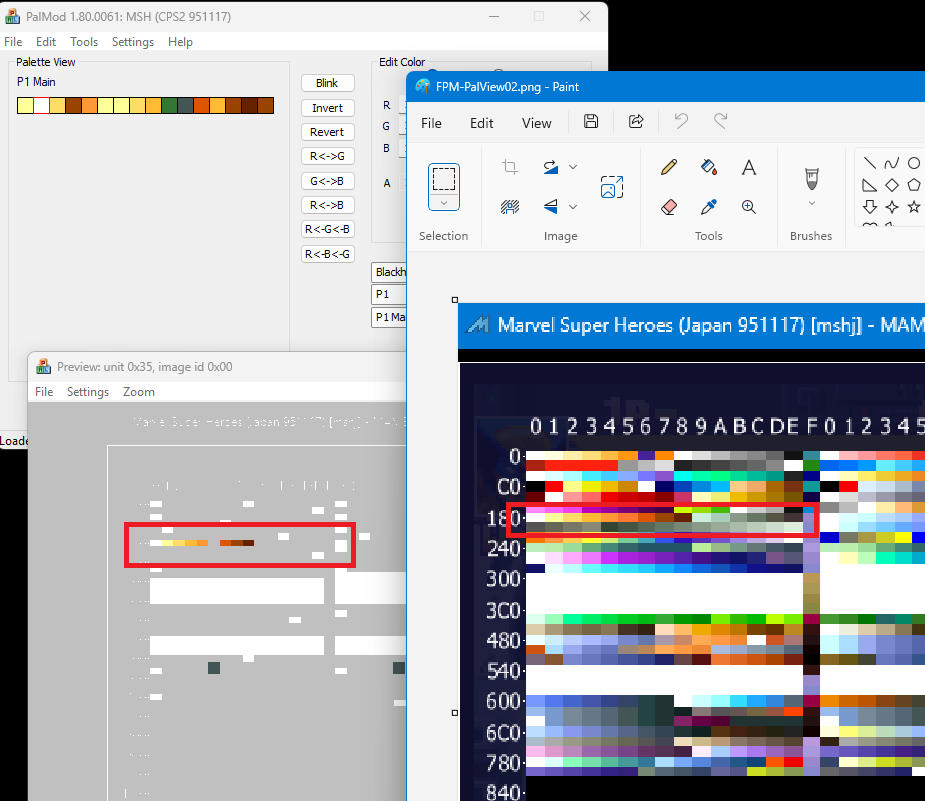
- Use CTRL+SHIFT+N or CTRL+SHIFT+A to copy that contiguous set of palette colors into PalMod as the current palette. Once you are done you should see those 15 palette colors in PalMod's palette view.
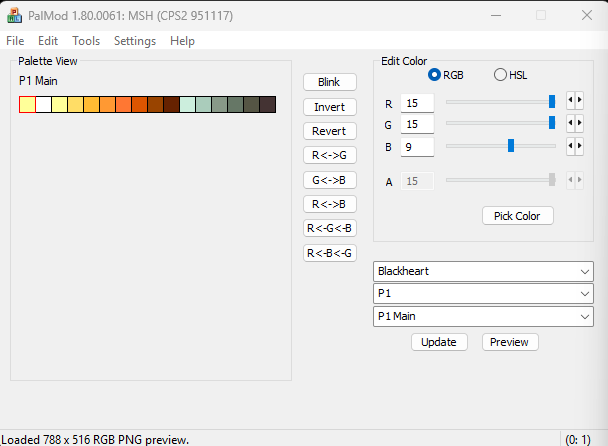
- Select color 1 through the last color you copied into PalMod in PalMod's palette view. (Don't copy color 0, that's the transparency color that we need to ignore.) Right-click on those colors and select "Copy Binary Data".
(Or you can press CTRL+C to copy the palette data to the clipboard and use the binary data shown there, but "Copy Binary Data" is simpler.)
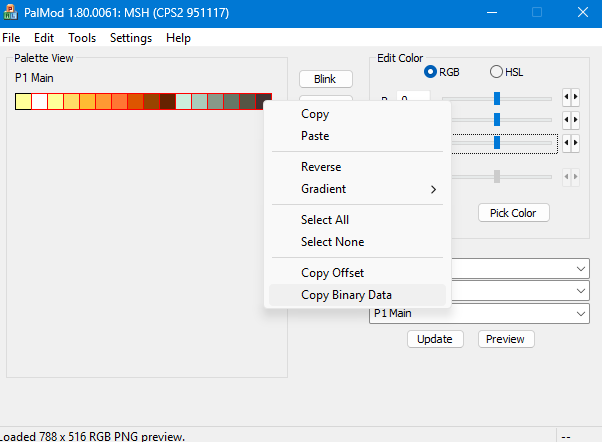
- Paste that into notepad or any text editor. In this case it is "FF 0F F9 0F D6 0F B3 0F 93 0F 73 0F 50 0D 40 09 20 06 ED 0C CB 0A 98 08 76 06 54 05 33 04 ".
Sweet: we now have the raw binary version of the palette we might care about. (If you used CTRL+C, look at the data that follows "PalMod's version of the data in the ROM at that location reads".) This should be a sequence of hexadecimal numbers. This should be exactly what we expect to find in the game ROM.
Repeat this process for each palette candidate, keeping track of the "data in the ROM at that location reads" for each candidate. We will be finding those in the ROM next.
Find the palette data in the ROM
Open the game ROM(s) of interest in your favorite binary editor/viewer. I use Visual Studio. Now use that binary data text ("FF 0F F9 0F D6 0F B3 0F 93 0F 73 0F 50 0D 40 09 20 06 ED 0C CB 0A 98 08 76 06 54 05 33 04 " in this example) as a search string. Write down the offset of any matches found. There will often be multiple matches, so make sure to check for them all.
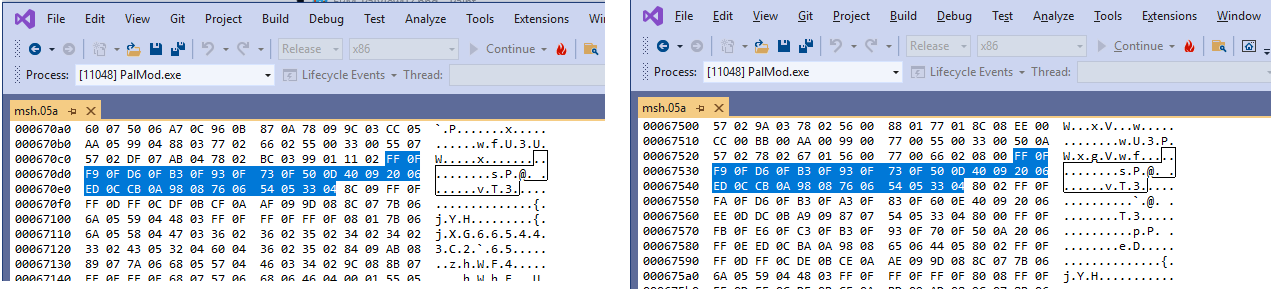
Jot down the offsets in the ROM where you found these palettes. In the picture given we found two matches for our search. Those hex locations start at 0x670ce and 0x6752e respectively. But remember we are ignoring the first transparency color, so we at least want to subtract one color length (for 16bit color, that is 2 bytes, so subtract "2") from the offset location value. Continue doing this for each candidate palette. So now we want to look at 0x670cc and 0x6752c.
Now we need to test our theory!
Open up an Extras file in PalMod by using the File : Open Extras File menu. You can leave all the options unchecked: we just need it to exist.
Paste in the locations in this general syntax:
         Candidate 1
         Location offset value minus at least the two we discussed
         Location offset value plus at least 0x20
So since we have these two candidates at 0x670cc and 0x6752c, it should look like this:
         Possible location for ship
         0x670cc
         0x670ec


         Possible location for ship
         0x6752c
         0x6754c
Palette locations will almost always end in even numbers just due to how hardware works.
Once you have all your candidates in your Extras file, reload the game in PalMod using File : Load Last File/Dir.
Go down to Extra Palettes in the unit selection listview box in PalMod.
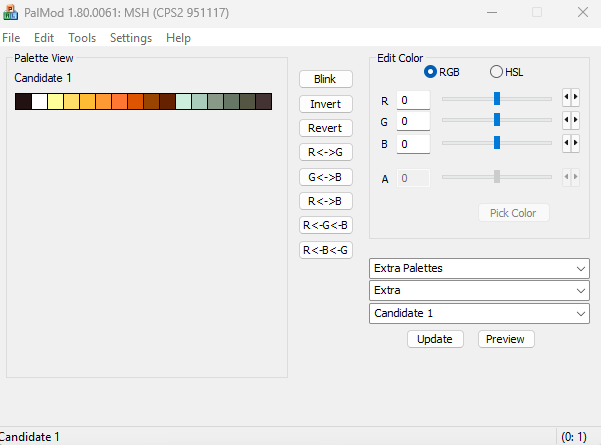
If you have partial matches on the palette, you can optionally try to match the sprite screenshot to these candidates. One should more clearly stand out. Note that you have to drag and drop the image again each time you change the palette view in PalMod, since we need to rematch colors. Anything that doesn't seem to match we can ignore.
Once we have our final list of candidates, change the colors in PalMod for each candidate to something stark or visible. If you use one of the mapping palettes you could save yourself time. So let's use PalMod's Mapping Palette tool to map the palettes:
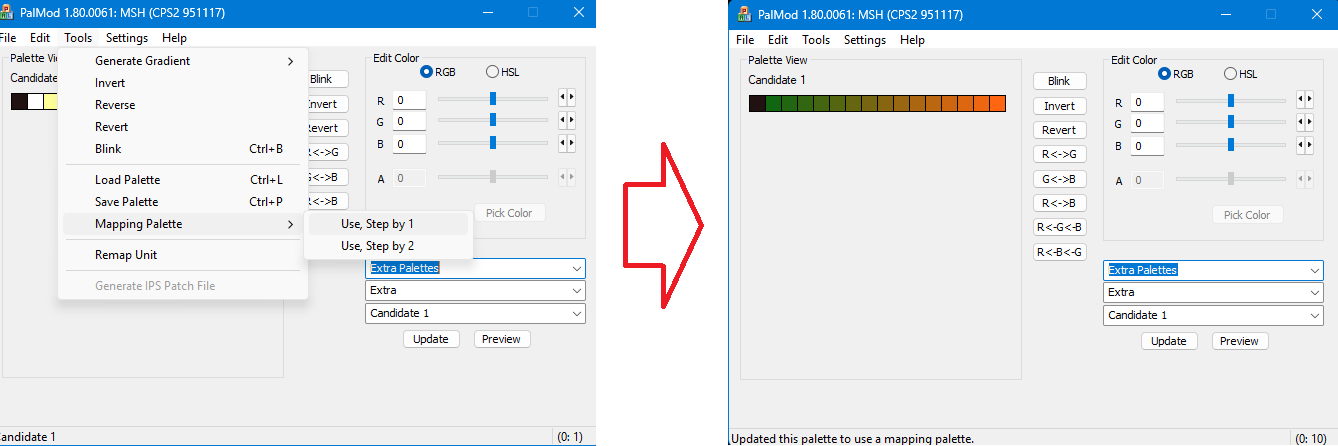
Make sure to update all the candidate palettes. The Mapping tool will keep updating its internal map so that each map is unique until you restart PalMod or run out of color space. But for most usage, you won't loop: there are a lot of colors. If you loop, it will indicate that in PalMod's status bar.
Save your changes to the ROM, and load them back up in your emulator. MAME can sometimes cache data, so clear out the MAME\NVRAM folder for your game. It also will error on mismatched ROMs, so run MAME from the command line in the MAME folder as in "MAME mshj" - that tells MAME that you are smart and allows you to bypass the "mismatched ROM" check. If we've succeeded, you should see your changed colors in the game. If we're lucky we know which Extra palette that was. If not, you can take another screenshot and match that back to the specific palettes in PalMod.
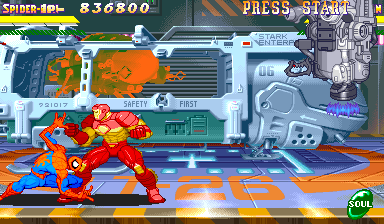
In our case we had multiple matches, so we need to figure out which is which. Since we used mapping palettes, each palette is unique now. So take a MAME snap of the object of interest using F12 again:
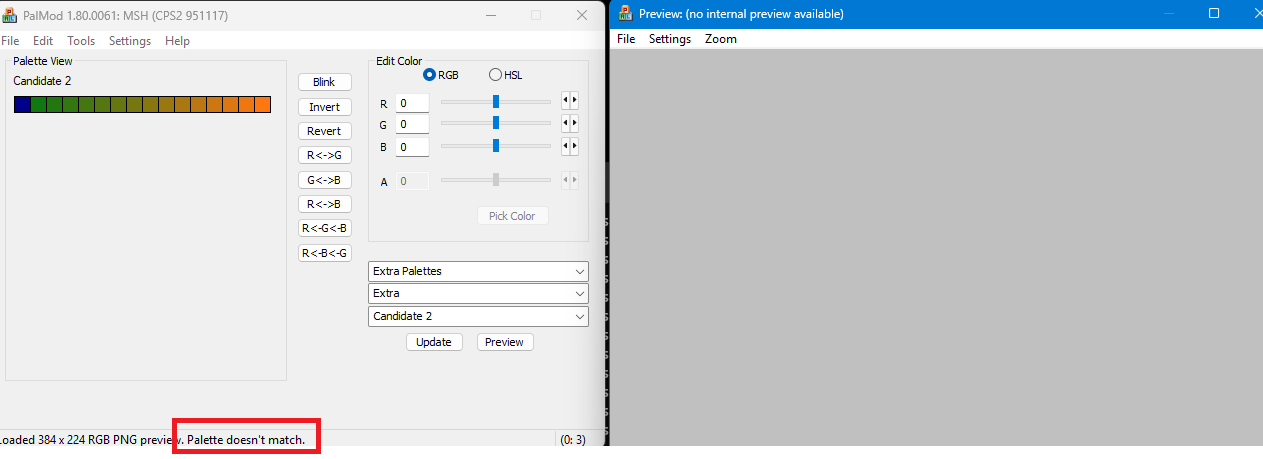
We can now drag and drop this snap onto PalMod's preview window. If we have multiple candidate palettes, only the actual palette will match. So for Candidate 2 we see nothing, and the PalMod status bar tell us that the palette doesn't match:
But for Candidate 1 when we drop the snap onto PalMod's Preview window we see clearly that we matched!
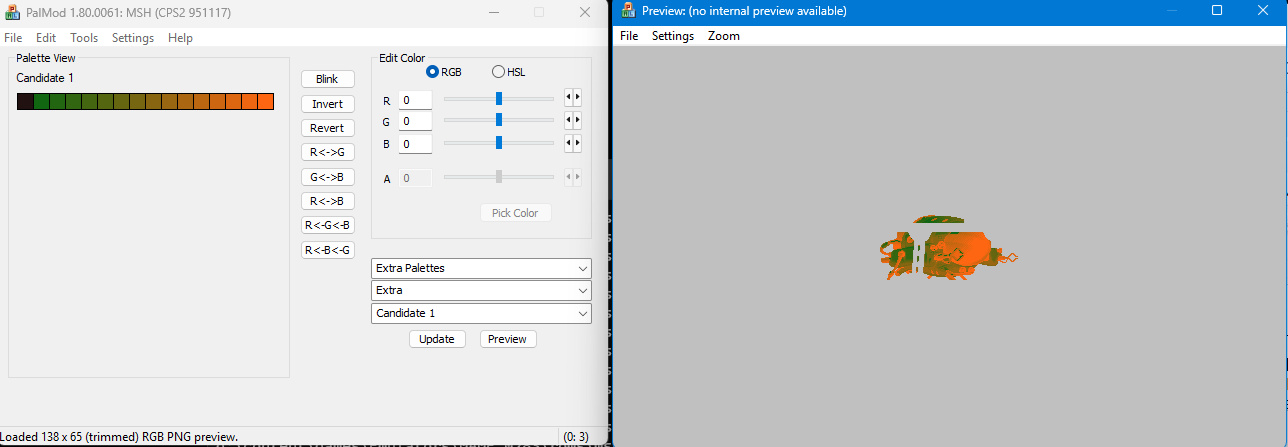
So now we know that the little explorer ship is at offset 0x670cc to 0x670fc. Plus we have an actual working preview! So let's save that now so we can use it in the future. Use PalMod's Preview window's Export Image. In that window, select File : Save. Then save it to either Indexed PNG (ideal) or RAW. In both cases those file types give you a texture you can use on PalMod's Preview window (or via Load Texture) in the future.
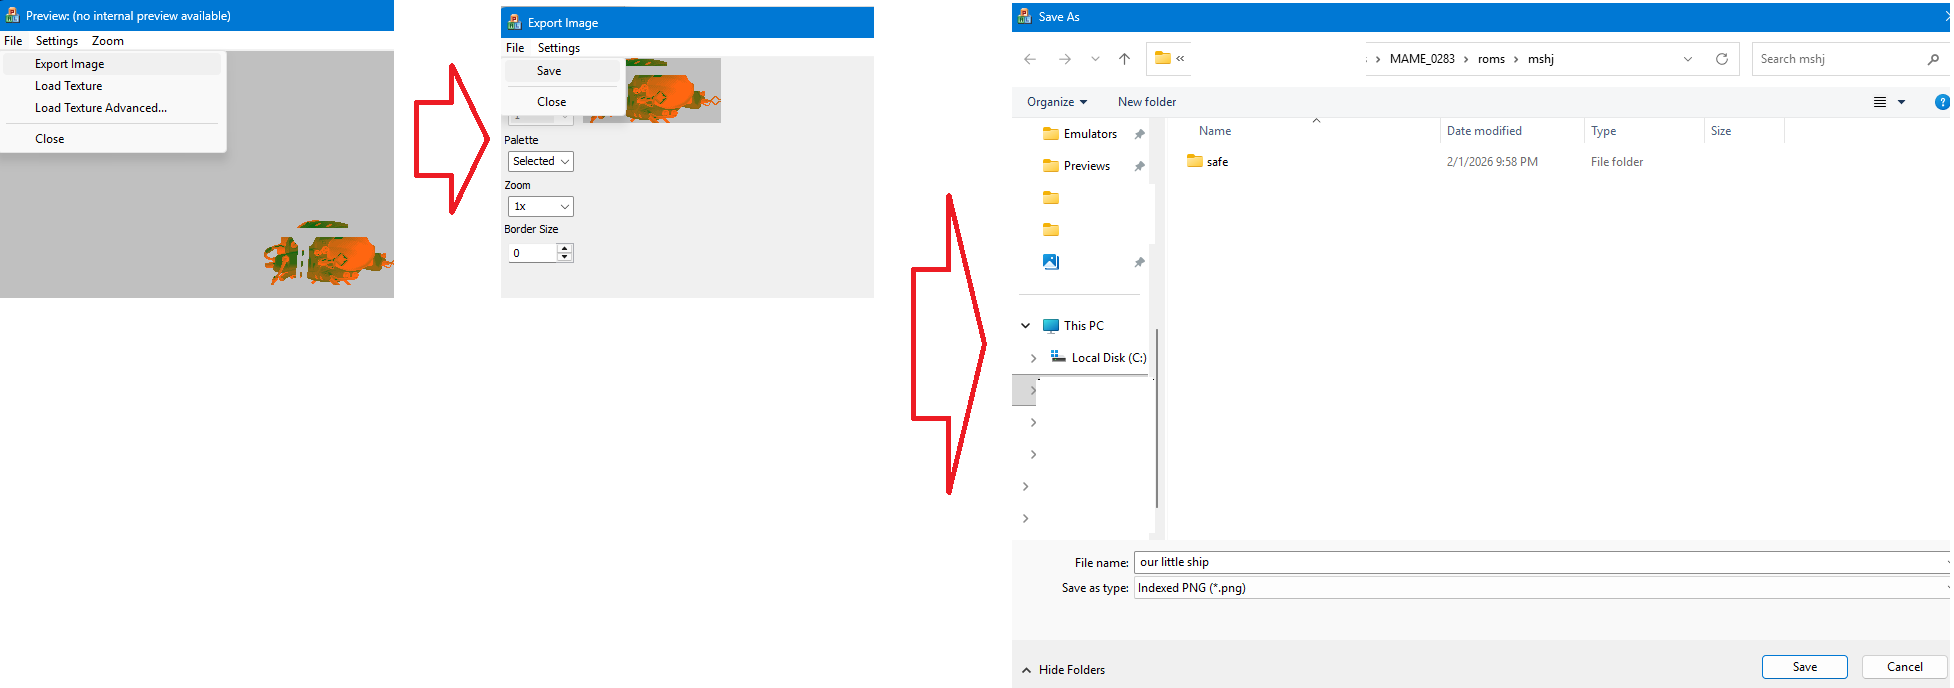
We can continue onwards isolating out whatever palettes we're interested in, but hopefully this example shows you how to follow this process. The preview we've made is subpar since it's clipped by the outer ship shell: we can probably fix that via using WinKawaks as noted in the Advanced Tactics below. But you know how to find the palette for a given sprite now, and that's the important part. And here's our little preview:

And now if we go use our new Extras file in conjunction with an untouched ROM - or otherwise copy or restore the original colors, we can update that preview to use the real colors:

Once you've finished and found where those palettes are located, consider letting the PalMod team know so that we can add support for that palette into PalMod. :)
Advanced Tactics
* MAME is usually the best possible option for stage and background rips. If you press F4 to get to the Palette Viewer, for some systems you can press Enter and get to the Tile Viewer. Press ENTER to rotate between the Palette Viewer, the graphics viewer (if available), and the Tile Viewer (if available). All we care about is the Tile Viewer. That is where all the background (such as stage) layers are drawn. Normally the user only sees a clipped version of these stage layers, but the Tile Viewer shows the entire layer. You can use "[" or "]" to change between the three layers. You can use "-" and "+" to zoom out, but note that you must capture at 1x zoom so that the preview size is correct. You can use the arrow keys to pan around the image - sometimes you need to pan in various directions to see stage aspects.
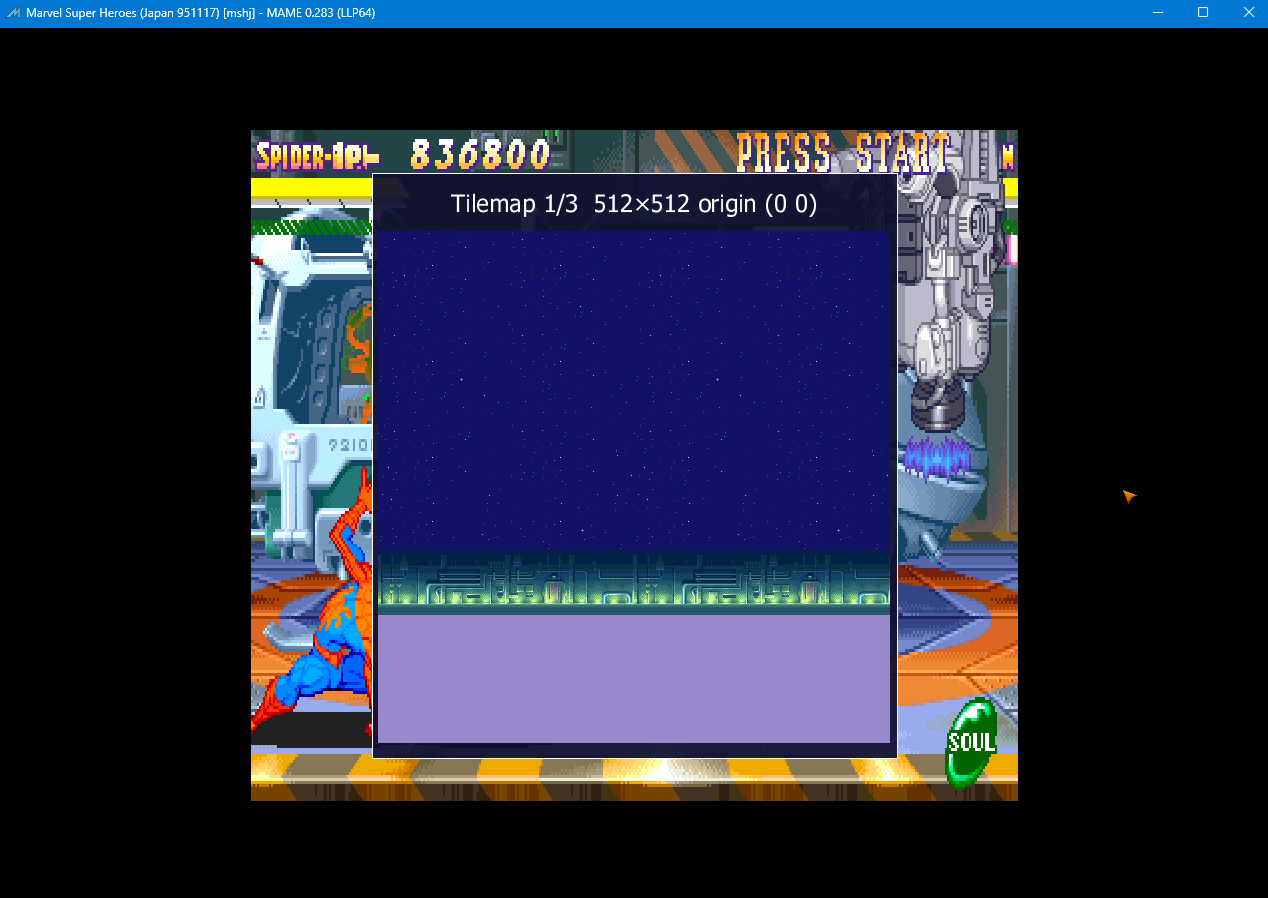
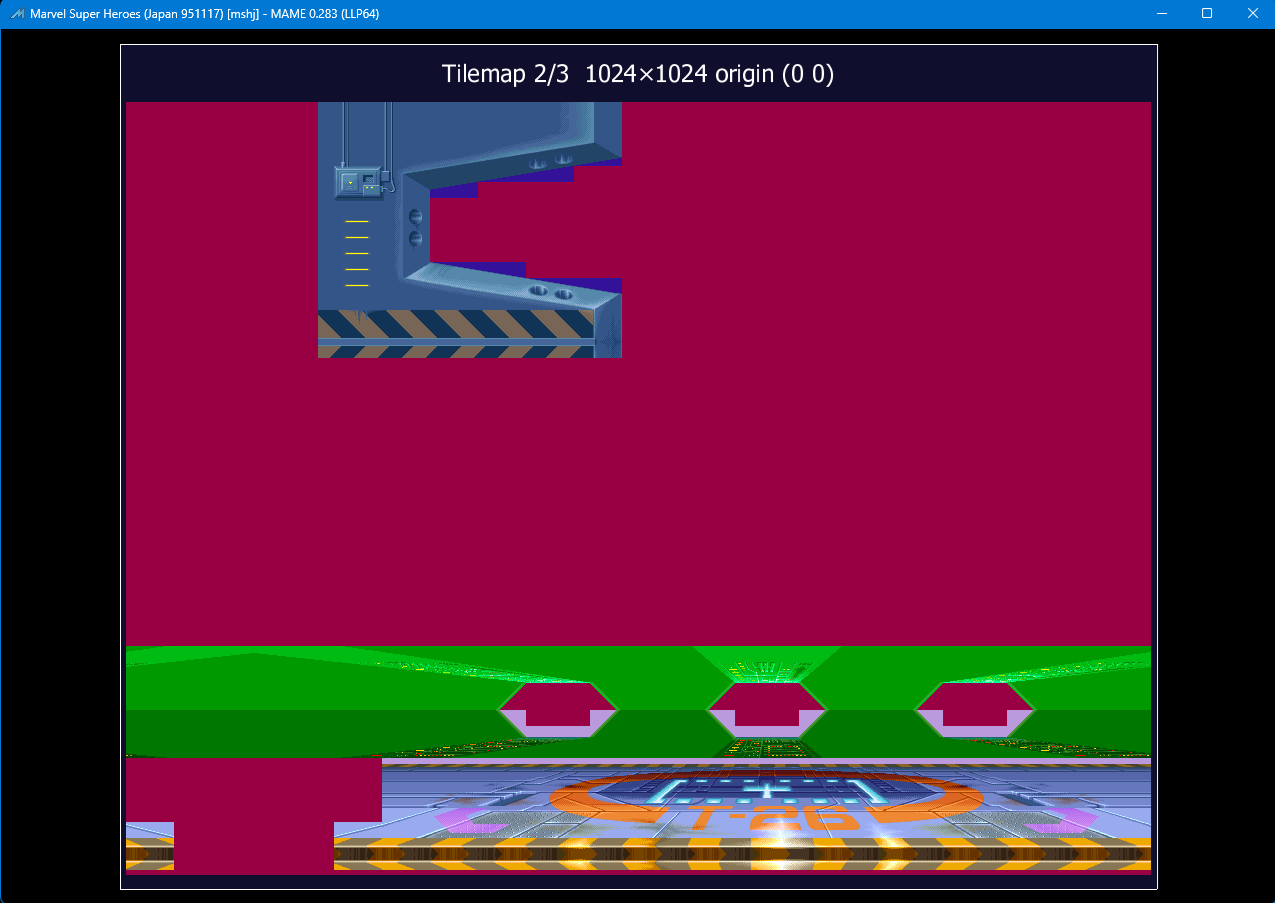
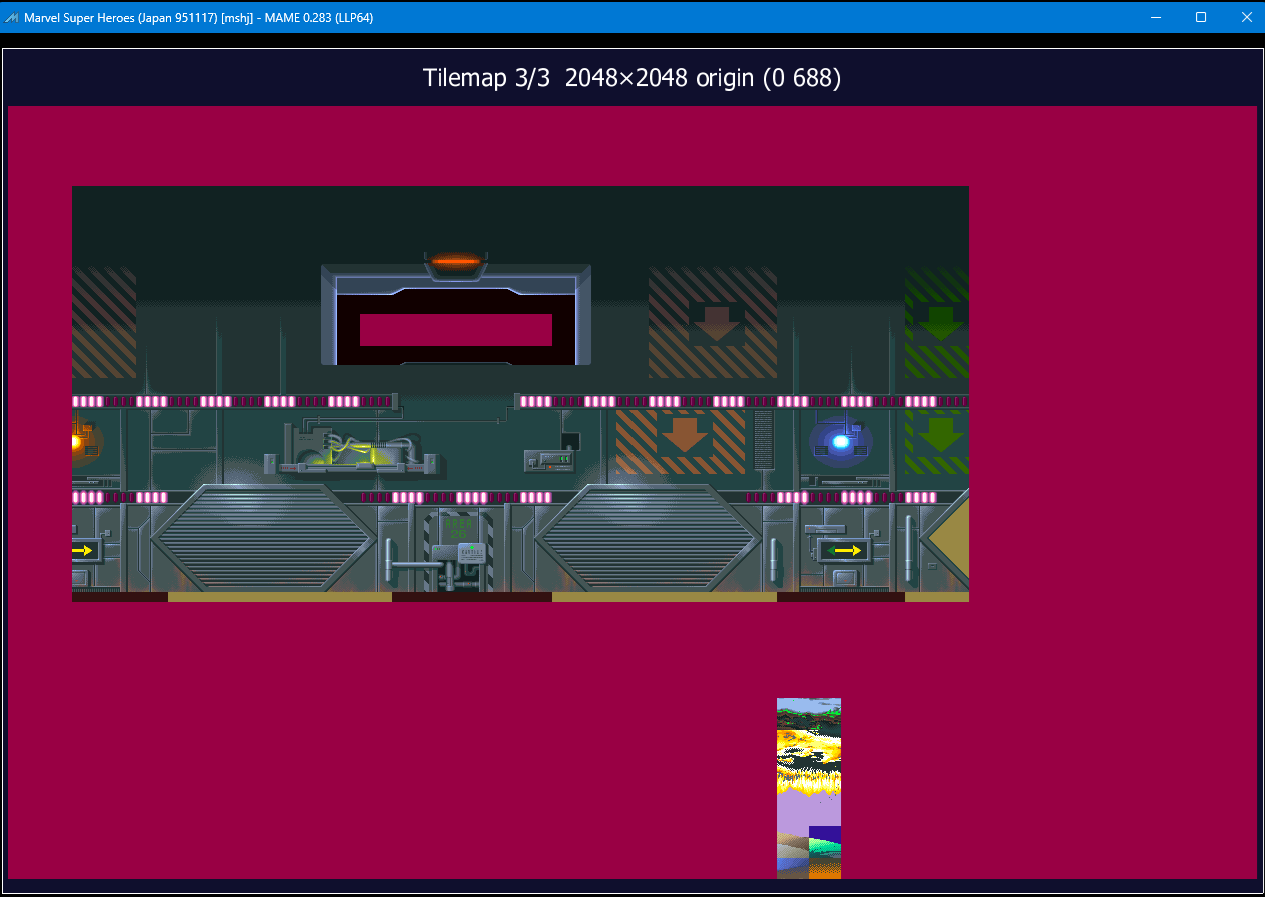
These layers are composited together usually with additional foreground stage sprites to provide the user the look of the stage. There's usually some parallax and movement, so be careful about ensuring you have the ideal "centered" preview. For more information, see the Capturing sprites with MAME guide.
* WinKawaks is fantastic for capturing foreground sprite previews thanks to their Shot Factory tool. See the Capturing sprites using WinKawaks guide for help with that.
×
![]()
|