|
PalMod: Capturing sprites using MAME
Howdy! I hope you're finding PalMod useful. This is a quick guide to generating indexed PNG files that can be used by PalMod for sprite display. PalMod has many sprites built in already, but you can pretty easily use MAME to expand PalMod's coverage further. This guide is a little wordy but it's pretty quick once you do it once. MAME is particularly great for capturing stages, as the ability to peek at the full background layers, as opposed to the clipped regions that a user sees, lets you get full-width captures. It is more difficult to perform great foreground sprite captures in MAME, so it can be handy to use WinKawak's Shot Factory for those.
There are THREE easy steps:
- Update that palette to use a mapping palette
- Take a (RGB PNG) screenshot of the sprite that uses that palette
- Use PalMod to convert that (RGB PNG) screenshot to an indexed PNG preview
Tools You Need For This
- MAME
- Arguably the best emulator on the planet. Crazy breadth of supported games. Any version will work here: the latest version typically contains the most bug fixes and best support.
- PalMod
- PalMod itself: a tool used to modify palettes in game ROMs or files. Be sure you are using version 1.79.3112 or newer: that has required functionality here. (If you're using an older version of PalMod (why?), note that those don't use MAME-compatible math so this will not work.)
- PalMod MAME ACTs
- These ACTs provide color delineation, avoiding problems with repeated colors within the palette. There are TWO options here, and which one you choose is important. If you are trying to work with CPS3 games such as any Street Fighter III game, Jojo's, or Red Earth (Warzard), you must use the MAME CPS3 ACTs that work with MAME's CPS3 graphics correctly. If you are working with any other game, you can use the normal older PhotoShop ACTs. Extract these out to a folder you can use them from.
×
![]()
How To
Get your game's ROM.
- Find the ROM set for the game that you want to use. ROM sets of interest might be jojobanr1.zip, msh.zip, mshvsf.zip, mvsc.zip, sfa3.zip, xmcota.zip, xmvsf.zip, and so forth. ROM sites can be questionable: looking for "MAME (ROM_NAME)" usually helps me find better results.
- Copy that ZIP file to the "roms" folder under the MAME folder. Make a back-up copy of this ZIP somewhere, since we will be changing that ZIP during this process.
- For the purposes of this write-up, I will pretend that you chose JoJo's Bizarre Adventure. That uses the zips "jojoba.zip" and "jojobanr1.zip", and "jojoba.zip" contains the files we want to modify. You can easily follow along with this guide if you do that, or you can do your own thing and just keep track of the different things you're doing.
Use PalMod to update the sprite of interest to use a differentiated palette.
- Extract the files in that ZIP out to somewhere.
- Open the ROM in PalMod by using PalMod's File options. If you're looking at files named "10", 50", "51", and so forth you can open them up using the PalMod's Load ROM by game : Capcom CPS3 option for that game. If you're looking at files named things like "something1.0", "something1.1", and so forth those are going to be the game SIMMs. You want to use PalMod's Load Directory option for that game. Since in our example we are using JojoBA.zip, we know that contains the relevant files "jojoba-simm5.4" and "jojoba-simm5.5". We tell PalMod to open that up using Load Directory : Jojo's : "HftF Characters (Normal: Japan Arcade, Regulation: Off)" menu option and then selecting the directory we extracted JojoBA.zip out to.
- Go to the palette for the character that you want to create a preview for. For our example we will choose Jotaro. I'm choosing color "C" because I want to: you can choose anything.
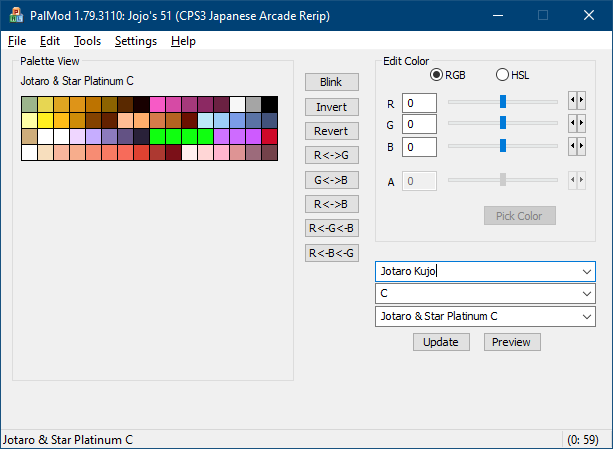
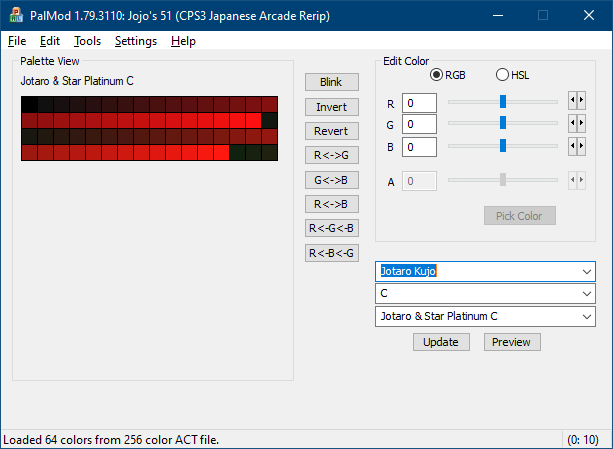
- Go to the Tools menu and select "Load Palette". Load one of the differentiated palettes from the MAMECPS3_ACTs.zip. (I am using Use MAMECPS3_Spectrum_000.act: the pack contains multiple ACTs to make advanced projects such as paired palettes and stages easier, as you want each palette shown on screen at the same time to be as unique as possible.) This ensures that the sprite we capture later can be used effectively. Once you have loaded up the palette, the Palette View table should look pretty rainbowy. (You can also drag and drop an ACT onto PalMod: we know to use the palette you just gave us.)
- Now go the File menu and select Patch Changes. This updates your ROM.
- Don't exit PalMod! Keep it open and we're going do a little trick later.
- Now copy that changed ROM files ("jojoba-simm5.4" and "jojoba-simm5.5", which you easily notice via their updated Date Modified timestamps) into the game ZIP file ("jojoba.zip" for Jojo's in MAME) in the MAME ROM folder.
Stop MAME from messing up the graphics
- Go to the MAME folder
- Open up the MAME.ini file there
- Change the value of "filter" (near the "OSD ACCELERATED VIDEO OPTIONS" comment) from 1 to 0.
- Save that file: you're done with it forever now and never need to do this again.
- (Note that if you do not turn off graphic filtering, MAME will extra distort colors and you will not get useful color matching.)
OPTIONAL: Install the MAME Cheat engine
- If you install the MAME Cheat engine, that will let you do very useful things like turning on Infinite Time and Infinite Energy.
- Once the Cheat Engine is installed and the game is running in MAME, press TAB to get to the MAME menu options. Scroll down to Cheat Options and turn on anything that you want to use. Infinite Time is very useful.
Run MAME but in a specific fashion!
- Open up a command prompt
- Change the current directory to the directory that MAME.exe is in.
cd c:\MyEmulators\MAME
or whatever.
- In that command prompt, start Jojo's within MAME by running the exact command:
MAME jojobanr1
If you're using some other game, replace "jojobanr1" with the "main" zip for the game you're using. The reason we use the command prompt here is that it lets us ignore the CRC32 checksum validation that MAME does.
- Wait for the game to load.
- You will get TWO informational dialogs before MAME lets you play the game. The first is the general system configuration information about the game you're about to play, and the second will be a warning along the lines of "One or more ROMs/disk images for this system are incorrect." since we did in fact modify the ROM with our color changes. You can ignore these dialogs. Note that if you try to directly run Jojo's from within MAME, as opposed to from the command line like we are doing, that it will not work. Running MAME from the command line tells MAME that we are a power user and are OK with the modified ROMs.
- Press 5 to add credits. Press 1 to have you (player 1) join the game, and press 2 to have a dummy player 2 join the game.
- For Player 1 select Jotaro color C by pressing the Space bar. It doesn't matter what Player 2 selects, just have them select something so we can get into the game.
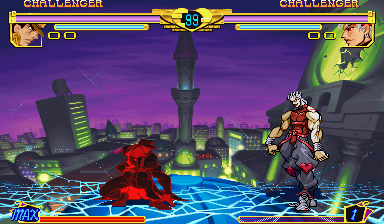
- Once the sprite you care about shows up, press F5 to pause. Since this is just for a quick demo, I'll use the Crouching sprite. Take a screenshot of this. For MAME, you take a screenshot using the F12 button. That will put it a screenshot in the "snap" folder and then in the subfolder there for your game. So in our example, we will find our screenshot in the folder "snap\jojobanr1". The reason we use the MAME screenshot is that this screenshot is actual-game-screen-sized, so the sprites are correctly sized:
- We are now done with MAME! But while we're here, let's look at some advanced features in MAME. Press F4 now.
- Pressing F4 takes us into the the special graphic options: the palette viewer, the tile viewer, and, if the game supports it, the map viewer.
- The palette viewer shows us all the palettes. Press "-" to zoom out so you can see all the palettes. Take a screenshot of this. While in the graphic viewer options, you can't use the F12 button, so instead use ALT+PRINT SCREEN to take a picture of the zoomed out palettes if you want to save it for later:
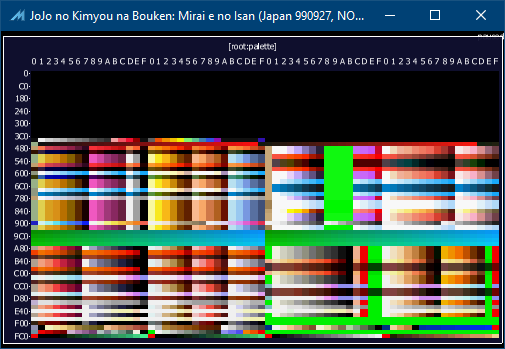 . .
If you want to save a view of the palette (useful for figuring out what palette might be used on any particular screen view), aste this screenshot into MSPaint (or your favorite graphics tool) and save it somewhere.
- Usually the characters are towards the top half of the used palettes. The stage palettes are usually in the middle half. We'll get back to this below.
- Now press RETURN to get to the tile viewers. By default it starts in the 8x8 tile viewer. Zoom out using "-". Hold right arrow to switch the active palette used to draw the tiles: eventually you can see that this is the HUD section, more or less. Cool, let's move on.
- Press "]" to get to the 16x16 tile viewer. If we zoom out, we can see all the mathematically chopped up tiles that the game is using to draw the characters on screen. This is not generally useful unless you are either a masochist OR use a "tile reassembly" tool such as Yoshin22's Stitcher. Again you can change active palette used for the tiles using the left/right arrows.
- Press RETURN again to get back to the palette viewer. On some systems that RETURN press would show you the Map: that is super super useful for stage captures. But we don't have it here in our example with Jojo's, so oh well: just remember that a Map viewer is available for some systems, so if you can find it it can be very helpful to capture background elements that are otherwise clipped.
- We're done with MAME! Feel free to close it now.
Bring back up PalMod!
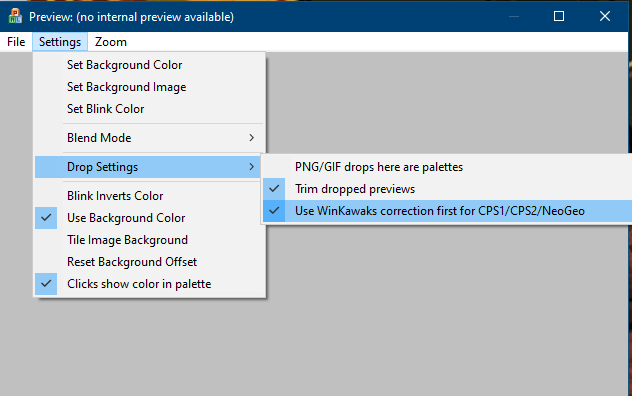
- Go to PalMod's Preview window. Because we are using CPS3 in MAME, the color matching we normally use for dropped palettes won't work. So we need to do two specific things:
- Go to Settings : Drop Settings and turn off "PNG/GIF drops here are palettes"
- Drag and drop "0000.png" (or whatever screenshot you took that shows the sprite) fomr the MAME "snap\jojobanr1" subfolder onto the Preview window of PalMod. (Or you can use PalMod's Preview : File : Load Texture option, whatever is easier.)
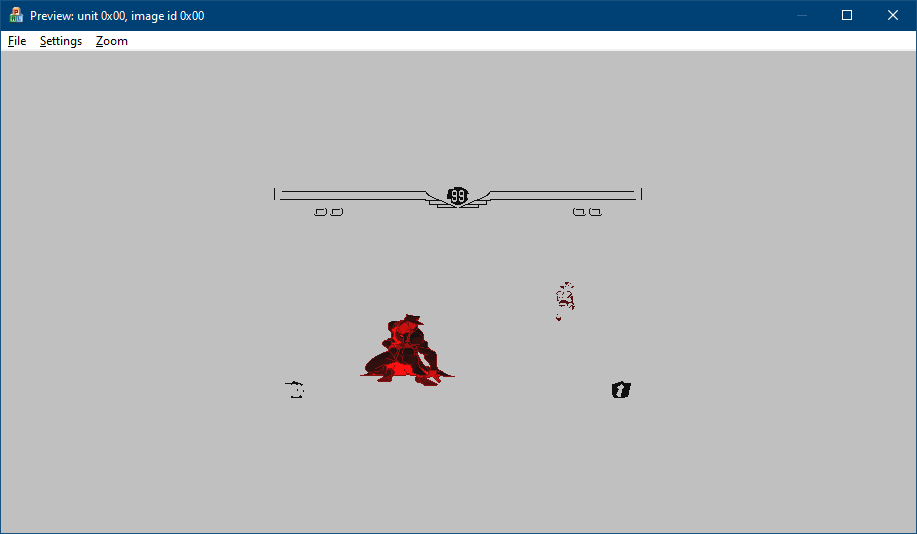
Note that this is clearly an imperfect import: there are game elements around the stage that are not part of that sprite. You can open up the PNG in MSPaint or any image editor and clip out any elements that are showing up and that you don't want. Once you have done that, drag and drop the updated preview and then you will see only that sprite.
- If you kept PalMod open like I told you to, press CTRL+Z (or Edit : Undo) to undo applying that Spectrum palette earlier and you'll see the original palette used in your preview.
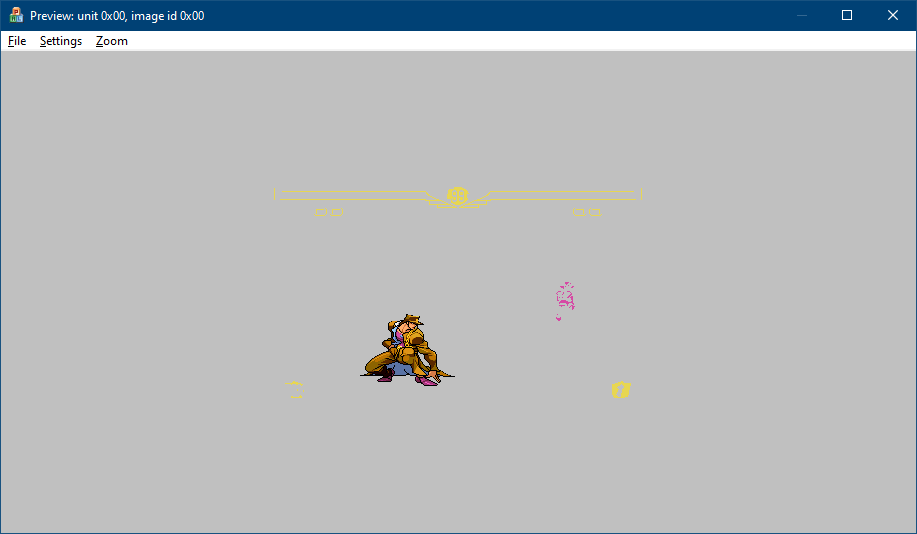
You can press CTRL+Y (or Edit : Redo) to reapply the mapping palette if you want to map the sprite again.
- Either way, now to go to Preview :: File :: Export Image and export this image as an Indexed PNG (the first option).
- That PNG can be viewed as anyone as a replacement preview if they have "PNG/GIF drops here are palettes" turned off. Or you can export it as a RAW, where it will always be used a preview.
You now have a preview for that sprite that will work for everybody, just like this:

(If you're using Firefox, you can just drag and drop that onto PalMod's Preview window with Jotaro up and it'll get used as a preview. If you're using other browsers, you can save it locally and then use it as a preview from there.)
Woot! If everything checks out here, consider submitting that indexed PNG to the PalMod team for integration so that others can benefit from your work.
Advanced Tactics and Tips
- For CPS3 games, only use the MAMECPS3 mapping palettes provided above. Any other mapping palette will not work correctly.
- You can take all the beautiful screenshots in MAME that you want and then combine the relevant sprite areas together in your favorite imaging editor. Once you're done, just drop that onto PalMod and we'll isolate out and index the sprites. If you're getting noise/garbage beyond the sprite, either use a different mapping palette with less color collisions or trim out those areas from your screencaps.
- This works for layered palettes such as stages or the two part Select/Winning palettes. That's why there's 10 mapping palettes. You just need to use a new mapping palette every 256 colors.
- PalMod only indexes the RGB PNG at the time you drag and drop it, so if you change which palette you're looking at you should drag and drop that RGB PNG back onto PalMod so that we rescan it for the current color matches.
- Once you have a mapping palette and generate a preview that works with that, you can use Palmod's File : Export Image and select another button color if they exist (such as Start) for that character to see how it looks like with "real" colors if you don't have the real colors immediately handy.
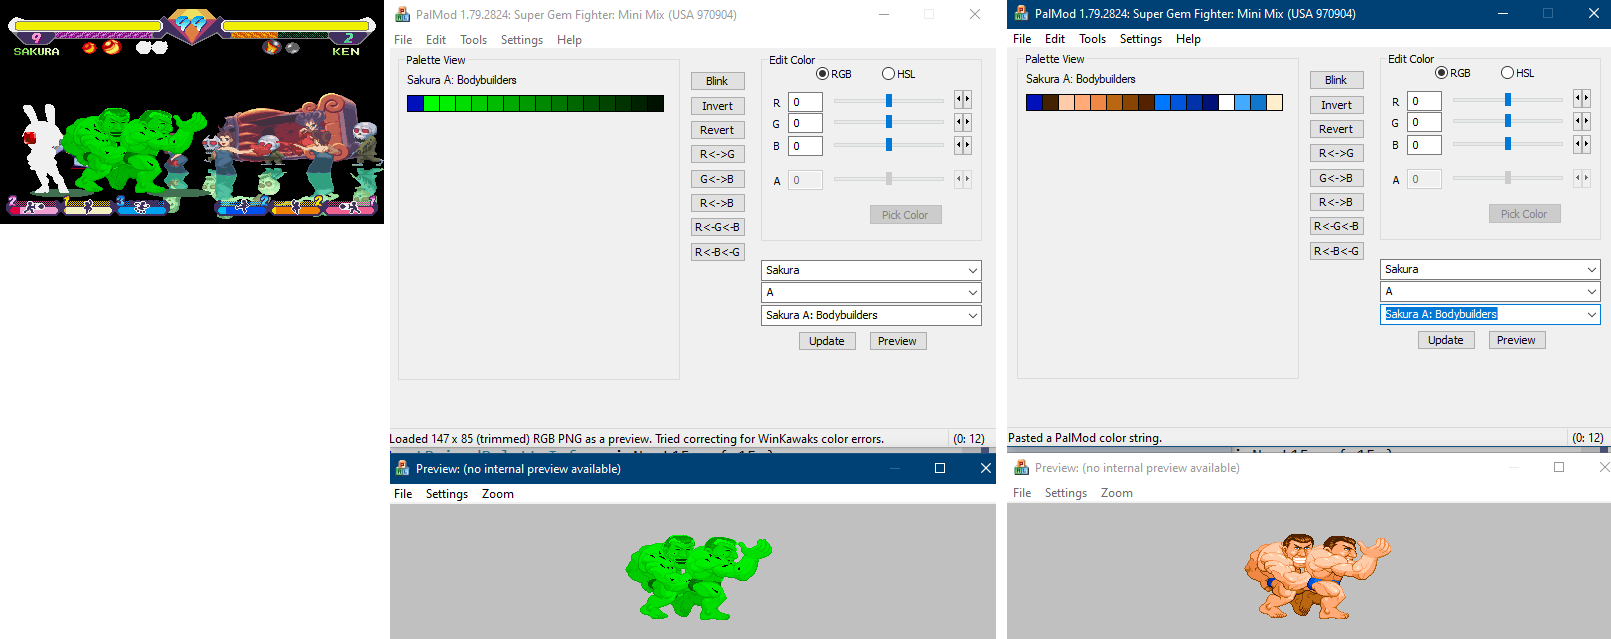
- You can stash extra data in your RGB PNG. If it references palettes 1 and 2 and those palettes don't contain any same colors, it'll load just palette 1 for palette 1, and just palette 2 for palette 2. Then you can export it back out (as indexed or RGB) and you'll get just the palette set that you wanted. Here's an example of PalMod just filtered out colors of the active palette:
- This works great for stages too. When I was working with Balrog stages for ST, I was using 12 mapping palettes at one time, and then let PalMod delayer the screenshot back for into a layer for each of the 12 palettes.
|