|
PalMod: Customizing Marvel.
Time to spice up your game visuals. This guide is MvC2-centric, but most of the methodology here can be used with other games.
Tools You Need For This
- PalMod
- PalMod itself: a tool used to modify palettes in game ROMs or files.
- A Dreamcast MvC2 CDI.
- You can find a vanilla copy of MvC2 here (except that this version unlocks all characters by default). The UOP Mix used at Battle of the Strongest 3 (2020) can be found here and is also a solid starting point.
- ... if you instead want to use the NAOMI version, just point PalMod to the MarvelVsCapcom2_unlocked.bin file using PalMod's File :: Load ROM menu option.
- ... if you instead want to use the Playstation 2 version, just point PalMod to the directory containing the PL*pak.bin files.
- ... if you instead want to use the PSN/Playstation 3 version, you would want to take the US PSN Marvel vs Capcom 2 PKG, get a PS3 PKG Viewer such as TrueAncestor PKG Repacker, and then open the MVC2-PSN package in that PGK Viewer. Extract out the data: you want everything in the NPUB30068 folder. Then the PS3 color files can be found under "NPUB30068\USRDIR\gdrom" in that folder. Point PalMod there using Load Directory :: MVC2 :: PS2.
- DAEMON Tools
- Mount the CDI using DAEMON Tools and copy those files to some place so you can modify them.
- Eidrian's multiple palettes guide
- This guide covers everybody who requires extra work to look right. (Such as Cyclop's jHK effect which uses his costume colors.) Full version covers how to edit move colors. Generally PalMod should handle this all for you these days, but you should double-check by playing your character after editing. Please note that if you just leave "Process Supplement Palettes" set to On, PalMod will try to handle this all for you.
How To Guides
- There are a number of easy guides to follow:
- You're done! Create a CDI in BootDreams and test in the DeMul emulator before burning so you don't waste a CD.
- Play your marvelous work of art!
Using PalMod for MvC2: The Basics
- BACK UP YOUR DIRECTORY OF EXTRACTED FILES.
- Decide exactly what you want to edit. The basic MvC2 colors are documented here.
- Open PalMod.exe. Go to the File menu and select Load Directory :: MvC2 :: DC (USA) Select your directory of extracted files. At this point you should see something like this:
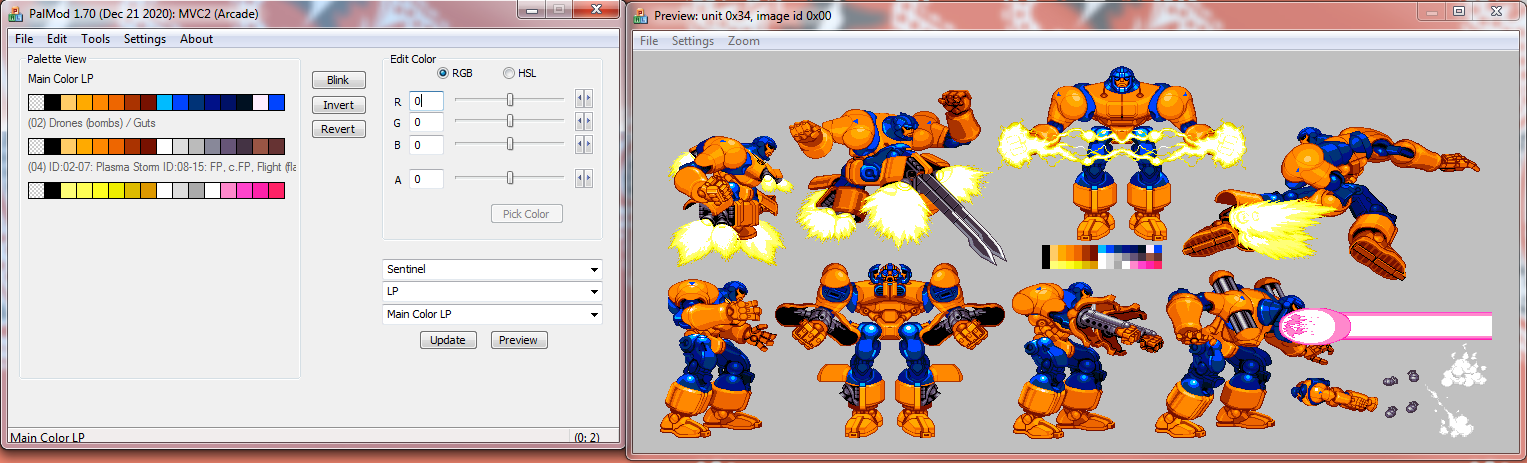
- The first drop-down listbox lets you select which character to edit. Set that to the character you want to edit.
- Use the second drop-down listbox to select which button you want to edit.
- For each of the 16 color boxes:
- Click it.
- Click the Blink (Sel) button. Now you know what it affects.
- Adjust colors!!! You can Undo (CTRL-Z) or Redo (CTRL-Y) changes until you choose Update. If you want to figure out what the codes are for any given color, you can always view a different character who has the colors you want.
- If you instead want to copy somebody, you have several options. If you have an .ACT (Adobe Color Table) or .PAL (Microsoft RIFF PALette file), you can import those using Tools :: Load Palette. If you have an indexed PNG file, you can also import that using Tools :: Load Palette. In both cases you can also just drag and drop the file onto PalMod and PalMod will do the right thing.
- When you're done, save your changes with UPDATE or just discard them by switching to any other palette.
- So now you've edited one character's single palette. One problem is that multiple palettes are used per character button-type (say, LP). Verify that you've edited that character corrrectly according to Eidrian's palette guide. If there are multiple palettes that need to be edited, it'll be listed there. If you don't edit those, the character won't look right. Please note that if you keep Settings : Process Supplement Palettes set to On, PalMod will try to handle these for you as much as possible. You will still want to double-check afterwards.
- Now copy those files to your Extracted Data directory, then follow the Create ISO and Burn CD steps and you're good to go.
WARNING: Some characters use multiple palettes
Some characters, such as Colossus, Silver Samurai, and Storm, are hard to edit because different palettes are used for different character sprites/poses even as they just stand there. They must be edited carefully or they'll look buggy. If they are in MvC2 and use multiple palettes, Eidrian's guide covers how to edit them correctly. Plus if you just leave Process Supplement Palettes set to On, PalMod will try to handle this all for you for all MvC2 characters. You can turn that off if you feel you can do better than PalMod's auto-logic.
Examples/What it looks like
PalMod Gallery
Color/sprite references:
MvC2 stock palettes
MvC P1 sprites
Ending images for all the Vs series (Shadow Jin, "Magneto" Megaman references)
SF MvC1 P1/P2 sprites at the Street Fighter Palette Database (has Chun Li, Gouki, Ryu, Ken, Dan, Dhalsim, Cammy, Guile, Sakura, Bison, Charlie, Zangief across the full series!)
If you want to try to copy colors from other images and that image is not an indexed PNG, open up that image interest in image editing software. Load the palette of interest into Palmod, then load the sprite reference you're copying from into your image editing software. In PalMod I BLINK the palette reference I want to edit, then find that corresponding space in the reference in your image editing software. You can copy that color the easy way:
have PalMod foreground
make sure the character color of interest is selected
move your mouse over the color you want to copy in the other app
press CTRL+SHIFT+C to copy or CTRL+SHIFT+V to directly paste that color into PalMod
This should be really easy. The hard way is to copy the RGB values by hand into PalMod. Note that most apps will use 0-255 RGB values: you can either divide by 16 or turn on PalMod's "Show 32-bit colors" option in the Tools menu. Repeat for all 15 palette colors. It's pretty quick once you get the hang of it.
Character color references to copy (no work!)
- Full sets
- Original palettes
- Cable
- (#10000F8DFF28DF059F025FFC9FD96FFFFFBBBF777F555FEEEFBBBF888F555FF22) - blue
- Captain America
- (#10000FFFFFEEEF555F333F222F111F000F900F900F500F311FFC9FC97FA64F111) - US Agent
- Captain Commando
- (#10000F9FFF0CFF18CF17BF049F18CF17BF049FD22FFECFFDAFFF2FEB2F951F222) - blue
- Cyclops
- (#10000FBFFF8DFF28DF059F025FDDDFCCCFBBBF999F555FEC8FDA6FA85FC22F000) - light blue
- (#10000F939F818F606F405F203FFF2FFE2FFB2FB71F950FEC8FDA6FA85FF22F000) - purple/gold
- Hulk
- (#10000FFFFF7EFF4AEF06CF038F026FA6EF84CF548F428F316FFEFFBABF878F000) - Blue MvC1 Hyper Hulk by Preppy
- (#10000FFAEFF8EFE7CFC6BFC5AF938F903F702F500F400F200FFFFFBBBF777F000) - Bubblegum Hulk by Eidrian
- (#10000F939F818F506F304F040F020FFE0FFF0F980F530F002FFEFFBABF878F000) - purple/gold
- Iron Man
- (#10000F000F999F939F818F506F304F111F000F222FFF9FFE0FFC0FE80FB60FEB0) - purple/gold
- Jin
- (#10000F000F420F200F222F100F444F011F000F111F000F222F111F222F222FF00) - Shadow Jin (from MvC1 ending)
- Juggernaut
- (#10000F000F951F741F520F420F310F6CFF18BF169F033F011F999F444F333F222) - dark-skinned blue
- Magneto
- (#10000F111FFFFF55CF22BF118F116FFD9FFA8FD87FA51FAA9FAAAFCCCFDDDFEEE) - blue/white
- (#10000F111FFFFF5FFF5DEF3AEF04AFFD9FFA8FD87FA51FC15F904F803F402F201) - superman/minty
- Megaman (requires tons of palette edits)
- (#10000F000FF50FD30FA30F939F638F517F306FFFFFBBBFFB9FEA6FC80F950FF77) - "Magnetic Shockwave" - (from MvC1 ending)
- Psylocke
- (#10000FE30F9B8F2F0F7F4F191F062F173FFE5FFA3FD62F940FD20FE30FFFFFE30) - RGA's awesome Poison Ivy Psylocke
- (#10000F020FEFFFBFFF8DFF28DF059F025FFC9FD96F950F730FF30FD00FFDBF956) - light blue
- (#10000F655FEFFFFFFFFEFFDBFFCBAF989F68EF64CF40BF940FF05FF05F888F903) - BlueJay's Mystique
- Rogue
- (#10000FFFFFFEAFEA7FC82F950F420F888F665F554F434F323F222F111F000FE00) - black
- (#10000FFFFFFEDFEAAFC93FA40F420FFBCFFAEFF8EFD7BFB58FE00FD00FB00FF5C) - pink
- Sentinel
- (#10000F000F988F444F433F222F111F000F9FFF0CFF18CF17BF049F036FFFFFF50) - blue/black
- (#10000F000FFC6FFA0FF80FE60FA30F710F0BFF04FF037F018F016F012FFEFF04F) - mango
- Silver Samurai
- (#1F000F000FFDBFEA7FC64FF88FF00FFE7FDA1FC80FA50F711F312F100F000F000) - Gold Samurai
- Venom
- (#10000F0F4F0C0F0A0F080F060F242F000FD33F822F611FFFFFEEEFCCCFAD0F5A0) - green
- (#10000FFFFFFBCFF9BFE69FC48FA25F000FD33F822F611FFFFFFBCFF9BFAD0F5A0) - pink
- (#1F000FF10FD10FB10F702F402F201F000F8BFF79AF146FDFFFBEFF9DFFE00F800) - Minty's take on a Carnage Venom
- Wolverine
- (#1F000F000FF00FFF8FEE0FEB0FC80FFFFF310F520F941F731FFC8FEA6FA60F731) - classic brown/gold
- (#1F000F000FF00FDEFFCDEFABCF78AFFFFF310F520F941F731FCDEFABCF567F346) - classic brown/gold claws
To use these, copy the text string above, select the palette for that character, then just paste it in. Once you're finished tweaking, click File :: Patch to update the actual palette files, aaaand you're done! Very easy.
So, to put your own together you would follow the ComboMasher tutorial. Note that you really do need to use the old versions of those programs as otherwise it probably won't work right. Also you can use the DeMul Dreamcast emulator to test your work in progress so you don't waste too many CDs. :)
×
![]()
|